The first question that comes to mind after starting a blog is “how to write your first blog post on WordPress?” If you’re looking for an answer then you’ve come to the right place.
You have no experience with WordPress. But don’t worry, it is the easiest CMS (content management system) with lots of features. You can do so many amazing things in a few clicks. Including writing your first blog posts. And then more blog posts.
But you might also be wondering what to write in your first blog post. I’ll tell you that too.
Back to the first question, how to write your first blog post on WordPress?
Writing your first blog post is simple on WordPress and it needs a few clicks to format it well. Follow these steps to write your first blog post on WordPress and publish it.
- Create a new blog post on WordPress
- Write a blog post headline
- Write the blog post content
- Include H2 & H3 tags
- Add bold, italics, bullet points, numbered list, etc to your content
- Create a link
- Insert image/media into your post
- Optimize for SEO using the Yoast SEO plugin
- Use the preview option
- Publish the blog post
But this is not it, I will go deeper into each one of these and give you a step-by-step explanation of how to do it with screenshots. So you will know exactly what to do to write and publish your first blog post.
Want to save this pin for later?
This post may contain some affiliate links that is I may earn a small commission at no extra cost to you that I would use to maintain this blog. Thanks for understanding.
Let’s get straight into it.
How to Write Your First Blog Post on WordPress?
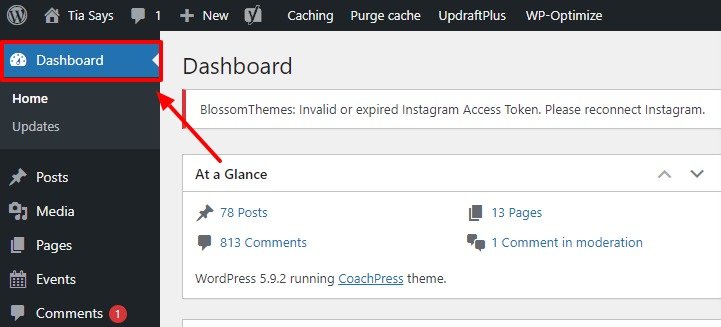
The first thing to do is to be on your WordPress dashboard. To return to your WordPress dashboard, click on the “Dashboard” option on the top left corner of your screen.
1. Create a New Blog Post on WordPress
Now, to write a post on your blog, you need to create a new blog post. To do that, click on the “Posts” option on the left sidebar and then on “Add new”.
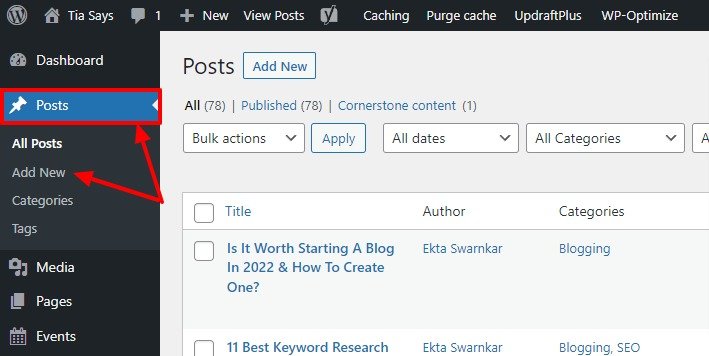
This will take you to a new screen from where you can do everything to write a new blog post on WordPress. Open the same screen whenever you want to publish a new blog post.
2. Write a Blog Post Headline
Next, you give a title to your blog post.
Writing blog post headlines is an important step because this is your blog post’s name. So, don’t skip this part. Also, make sure to write a catchy headline that attracts the readers’ attention and persuades them to click on it to read the blog post.
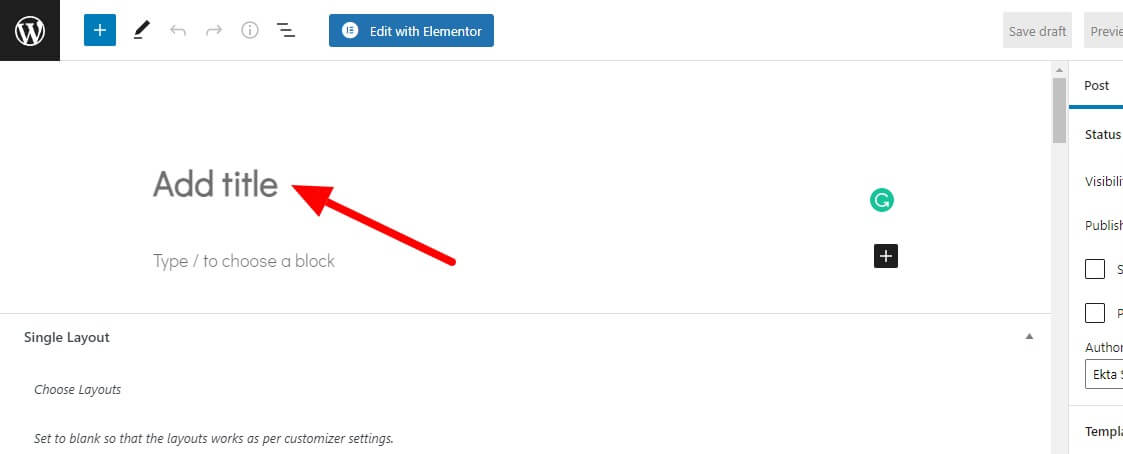
To add a headline to your blog post, move your cursor to “Add title” and type your blog post headline.
3. Write the Blog Post Content
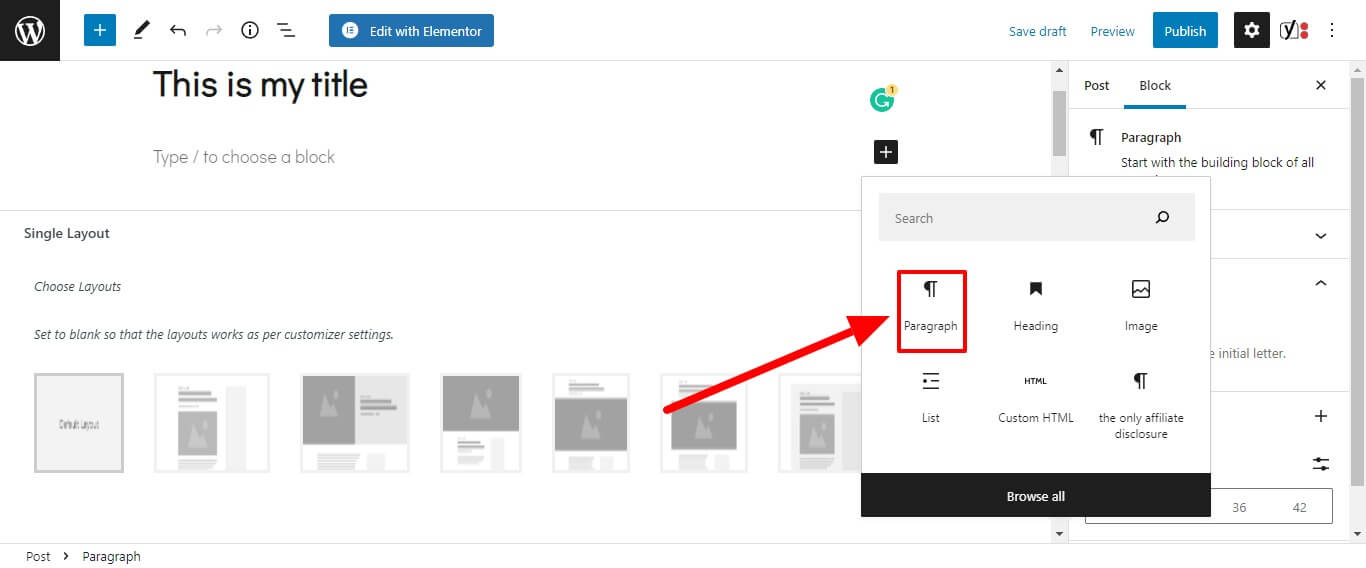
Now that you have given your post a catchy title, it’s time to start writing the content. Write your content in the paragraph tag. Click on the “+” button and choose the paragraph tag.
Another most common question that comes to new bloggers is what to write.
So, what to write in your first blog post?
The best thing to do is to answer these four questions in your first blog post.
- Who are you?
- Why did you start your blog?
- Who are you going to teach? Or what is your reader profile?
- What will you teach in your blog?
This is the best way to introduce yourself and your new blog to your audience. And let them know what to expect from your blog.
I know my blog’s first post is not an introduction post because nobody was there to tell me this. And I was doing whatever came to my mind.
Next question, how to start your first blog post?
How to write a blog post?
Before you begin writing your blog post, I recommend you create a detailed outline for it. An outline is a rough structure of how your blog post is going to flow. This outline will help you stay on the topic. It speeds up the writing process.
Here are all the important parts of a blog post outline.
The first part of a blog post is always an introduction. The introduction should be short and descriptive. Ideally, it should tell the reader what the problem is and that your blog post has the solution. It should motivate the reader to read the next section.
Then you write the main content of your blog post. The only function of the body of an article is to inform readers as much as possible. And provide them with tips such that they take action.
Now, you might wonder, how to end your first blog post?
That’s where you write a conclusion. In conclusion, you summarize what your readers learned in the blog post and motivate them to take action on what they learned.
I know that was a quick explanation, but that’s good enough for now. I’ll link to detailed posts on how to write different types of posts below this article so you can check them out.
4. Include H2 & H3 Tags
Writing a blog post is one thing and making it readable is another.
Your readers won’t like reading a wall of text. Most of them won’t even read your entire post. They will first skim through to see if the blog post has the information that they are looking for.
Think about it, before starting to read this blog post didn’t you also scroll to check it first? You wanted to be sure too. Heading tags help readers skim through the content.
Google bots also skim through the heading tags to determine the positions of your content piece. So, always add heading tags to your blog post.
To add heading tags to your blog post, click on the “+” sign that appears on the screen when you move the cursor and choose the heading tag.
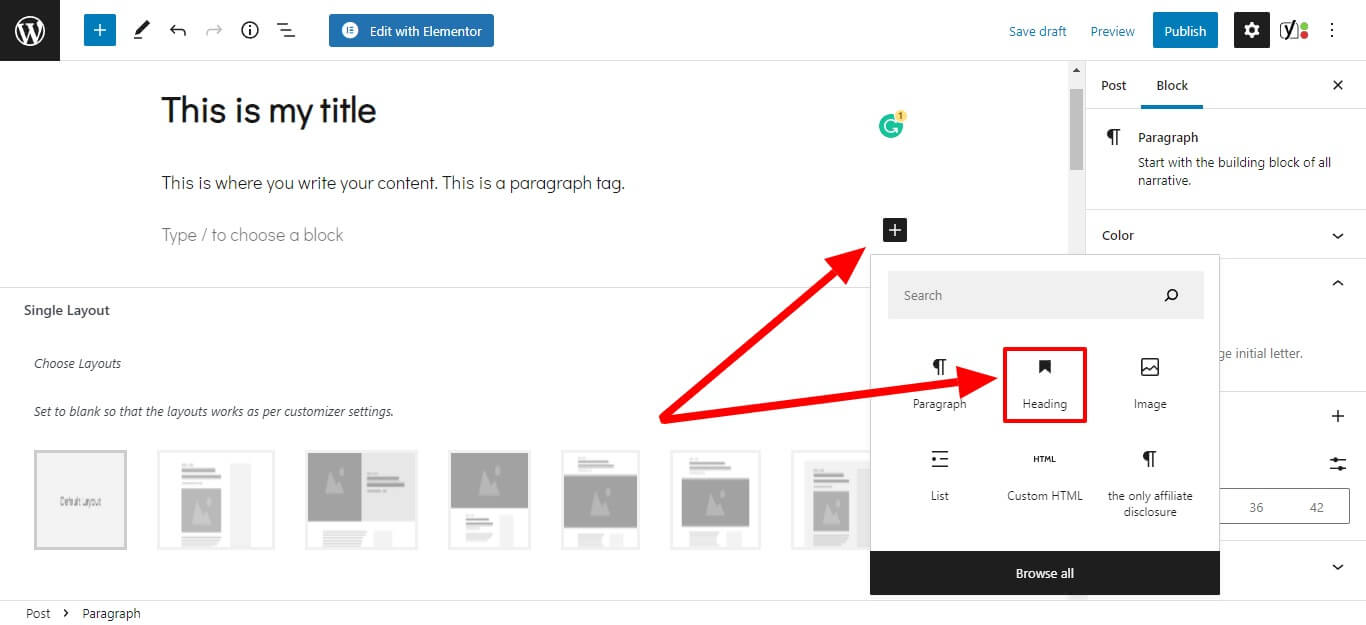
There are 5 heading tags – H1, H2, H3, H4, and H5.
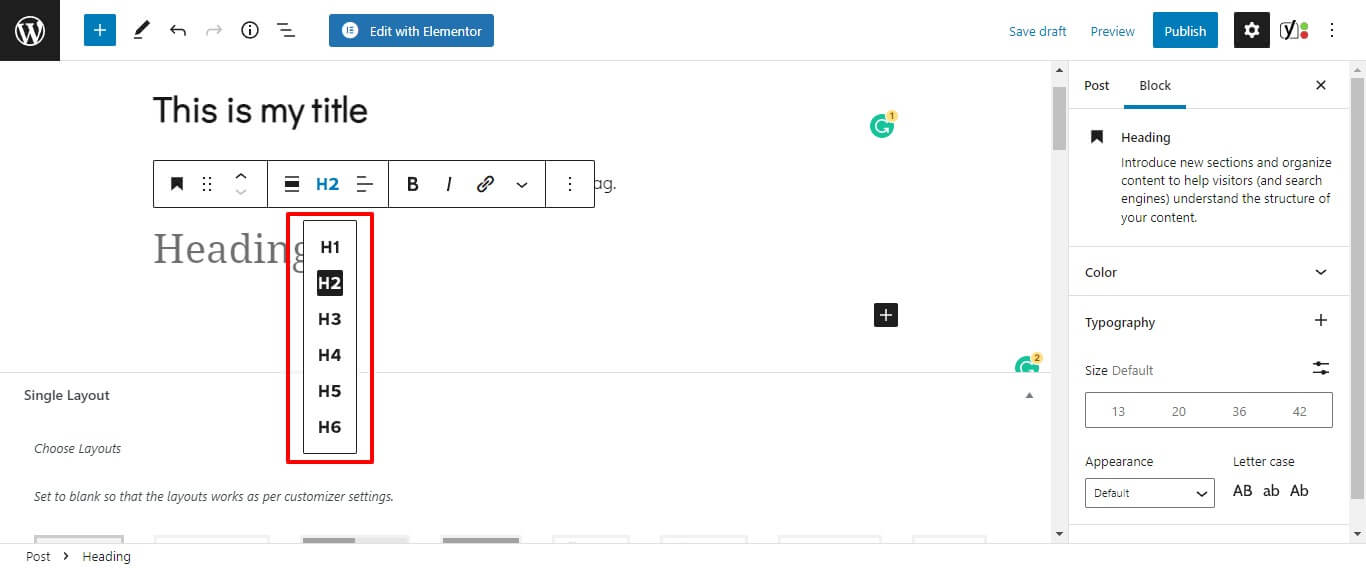
H1 is automatically the title of your blog post, so don’t use it again in your blog post to avoid confusing Google bots. You should only use H2 and H3 to keep the structure clean.
5. Add Bold, Italics, Bullet points, numbered lists, etc to Your Content
WordPress provides extra options to make your content more readable. For example, making a part of text stand out by bolding it or italicizing it.
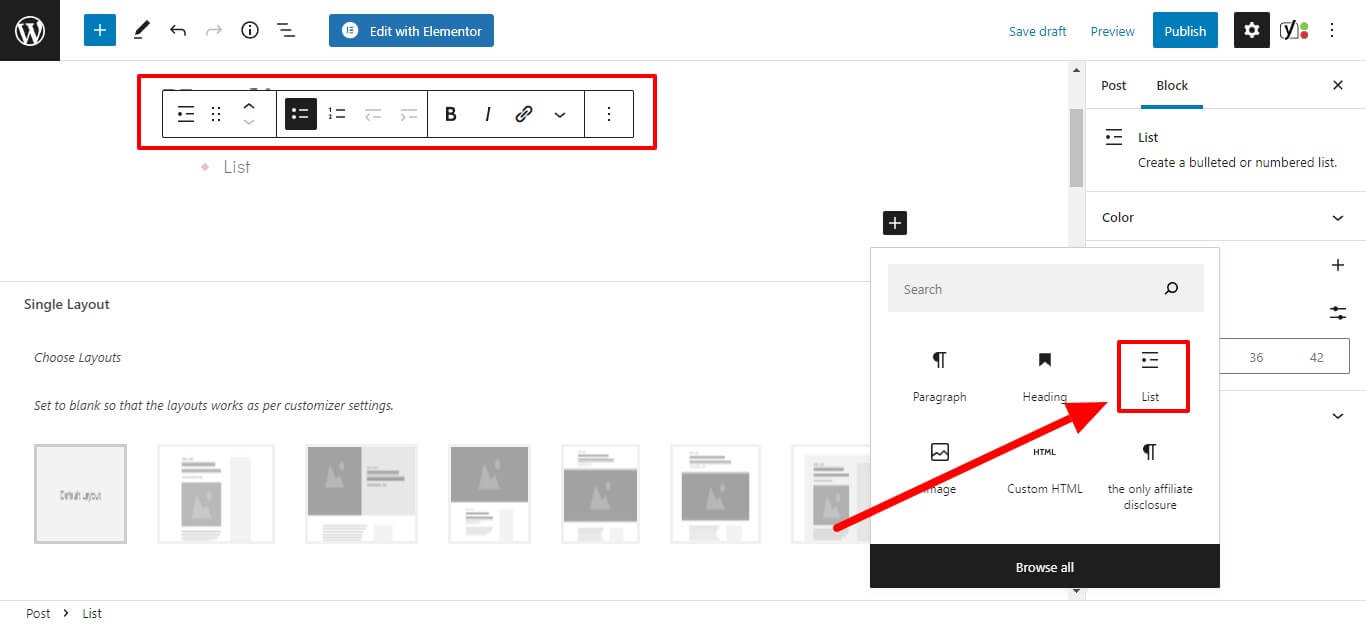
When you write something in the paragraph tag you will notice a top bar appearing on it. You should use these options to add more effects to your content.
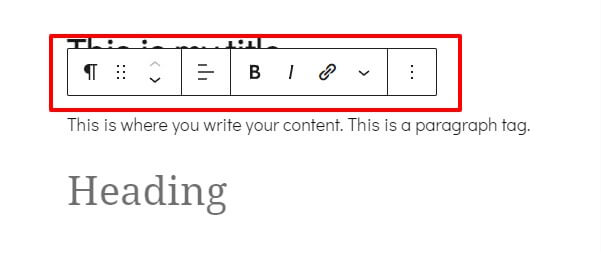
You can also add lists to your blog post, you might have noticed a few bullet lists in this blog post too. These things help in making your content easy to read.
6. Create a Link
Do you want your readers to check out some other posts? That’s when you add a link to your blog post.
Links are important. When you think about it, the whole internet is actually a huge link web. So, adding links is a must.
To add a link, highlight the part you want your link to appear and then click on the link icon from the top bar.
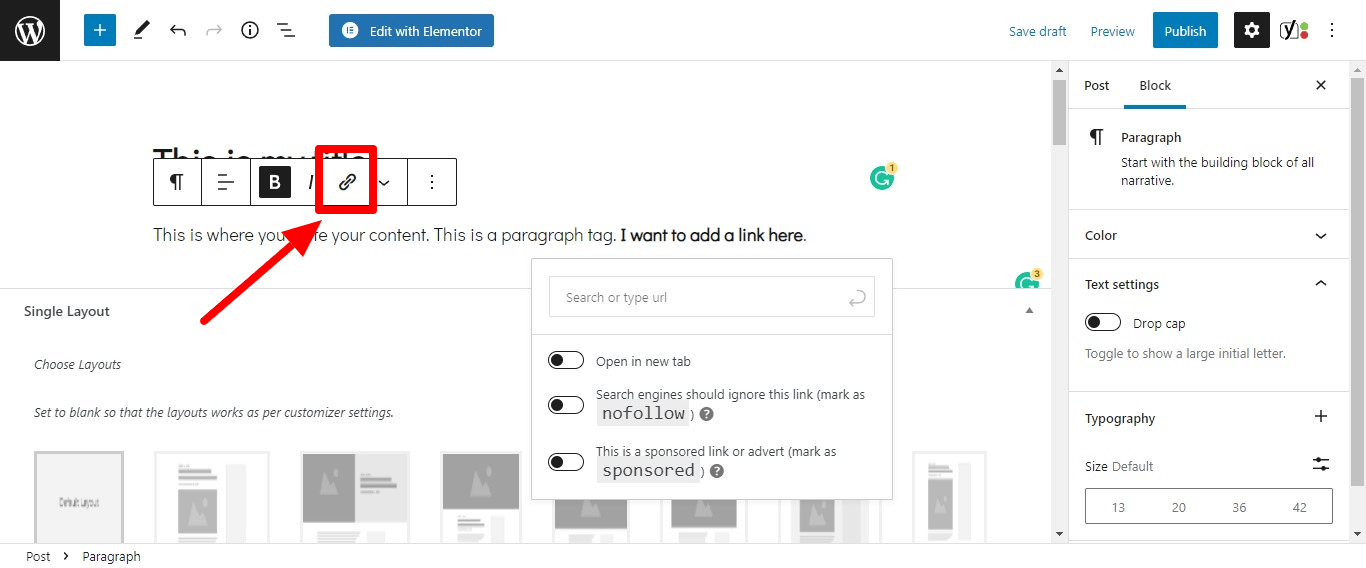
On this new text box, enter the link you want to include and click on or hit the “Enter” button.
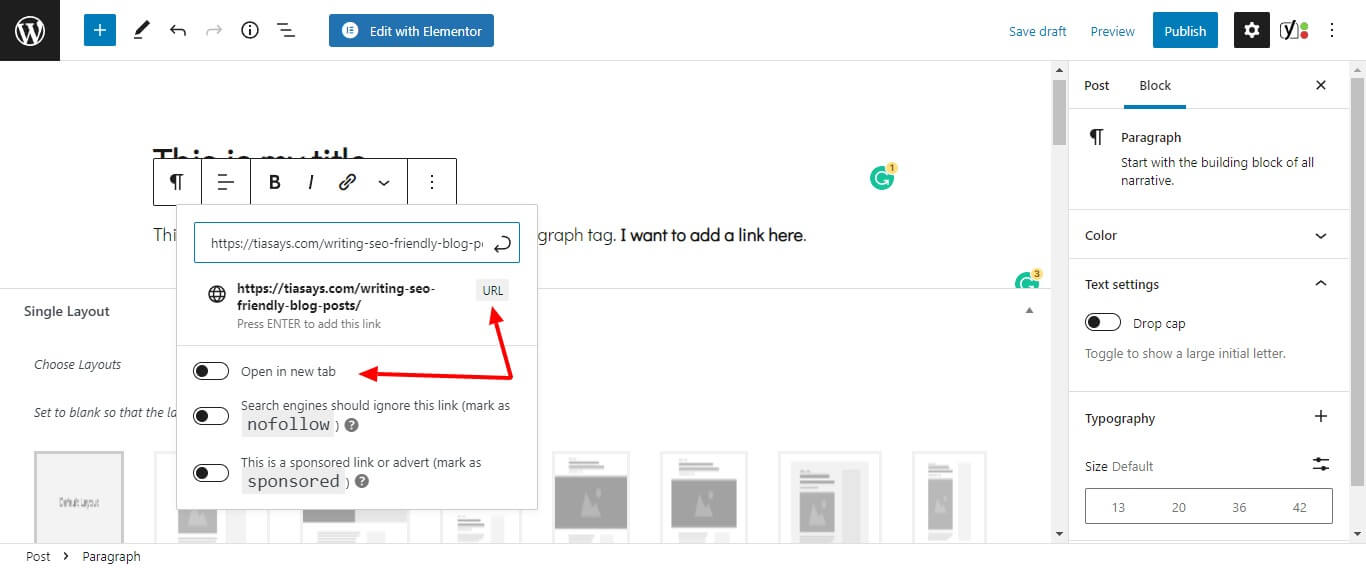
You can choose to “open the link in a new tab” to make sure that whenever a user clicks on it, it opens in a new tab.
7. Insert Image/Media into Your Post
If you’re wondering what else you can do to make your blog post more appealing, that’s right, you can add visuals.
Do you know images and videos are very helpful in gaining the attention of a reader? So, you should always add images and other media content to your blog posts. With the new WordPress, you can add any type of media content easily such as audio, video, image, etc.
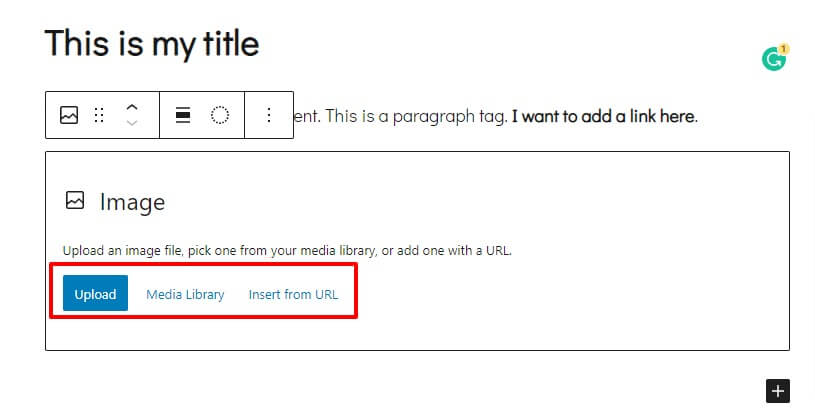
To add an image to your blog post, click on the “+” button and choose an image tag.
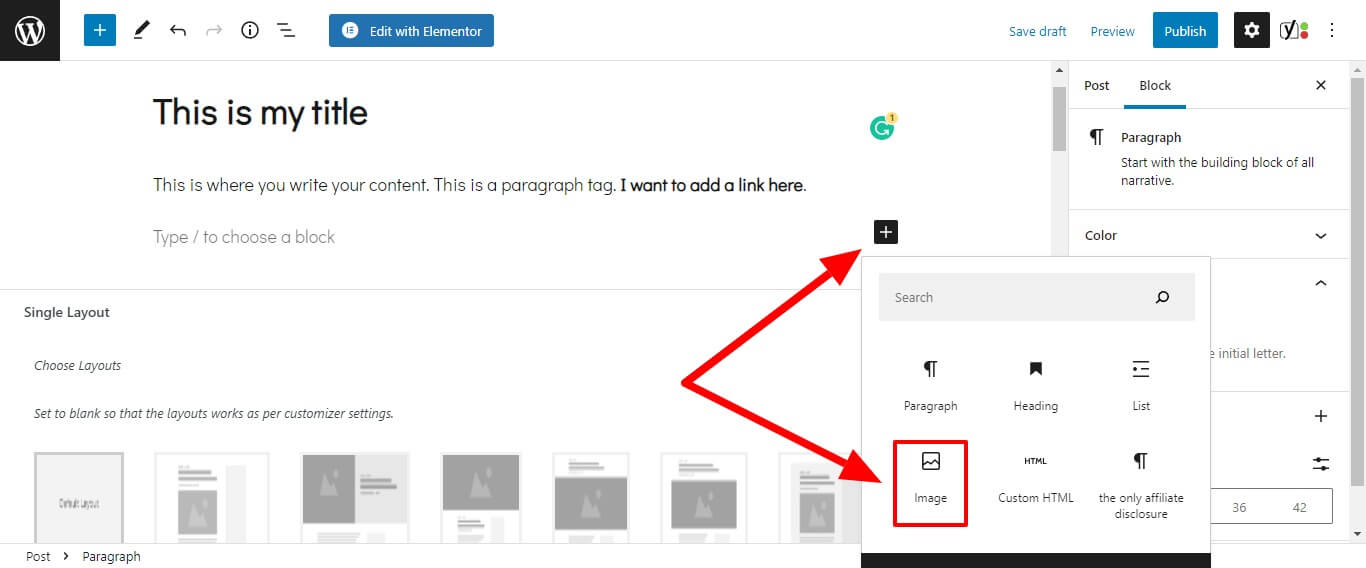
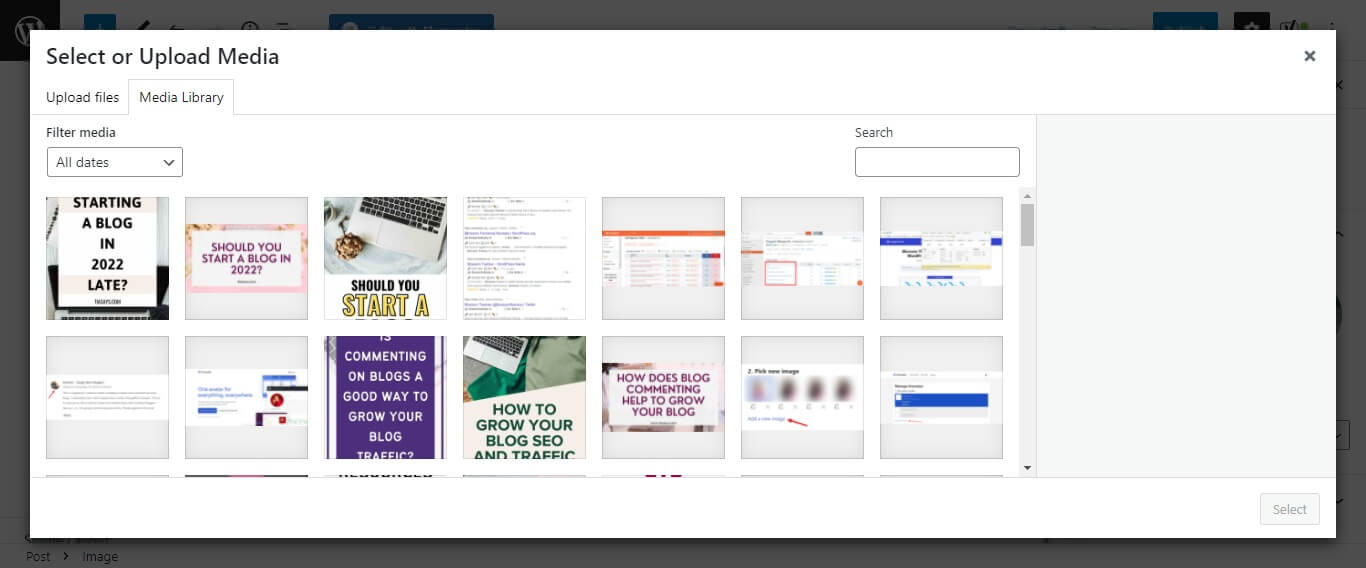
Choose either to upload an image or pick one from the WordPress media.
To choose from media, a new window will, you can pick an image from there.
Or you can choose to upload a new image from your computer.
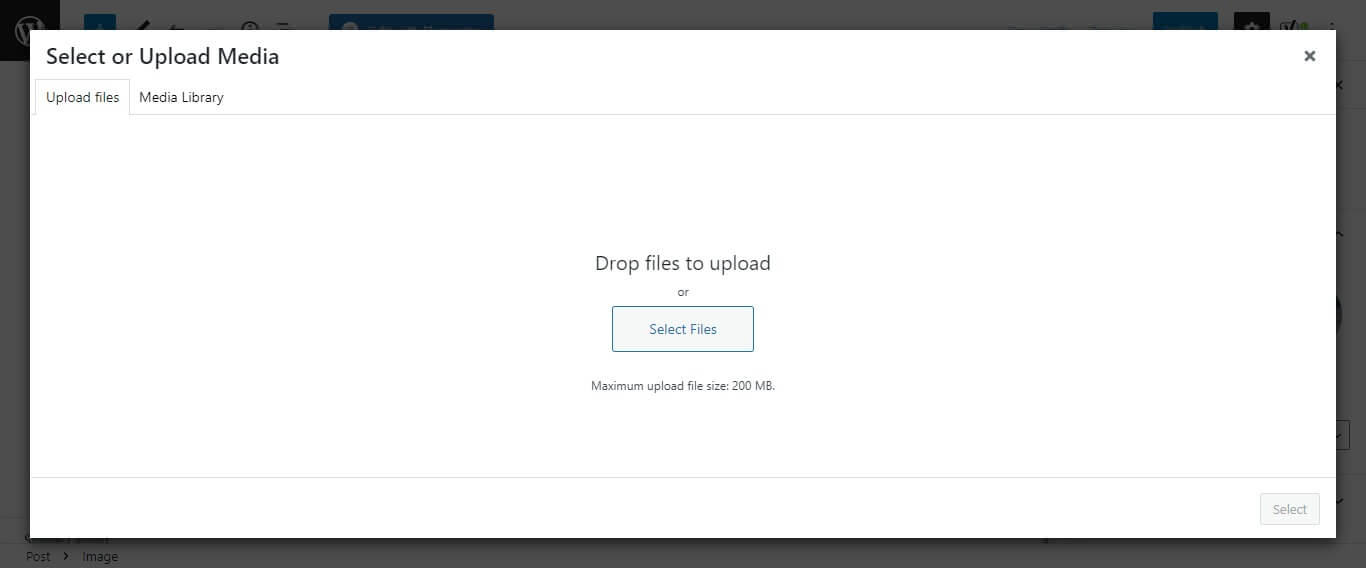
You can simply drag and drop files to upload on your WordPress dashboard. Make sure the images you upload are optimized properly. (Optional but important for future posts)
8. Optimize for SEO Using the Yoast SEO Plugin
This step is not necessary now as this is your first blog post. But you must start optimizing your blog posts for SEO early so you can drive some traffic from Google also.
To do this, I recommend you install the free Yoast SEO plugin and make sure that the bullets are green in color. For the red dots, you will see suggestions, follow them.

To learn how to write an SEO-friendly blog post, read this guide.
9. Use the Preview Option
Once you are done with your blog post, see how it will look to your readers. Make sure there are no errors, the links are working properly, the images look good, etc.
Use Grammarly to fix common errors and avoid silly grammar mistakes. Check how it looks by clicking on the “Preview” button.
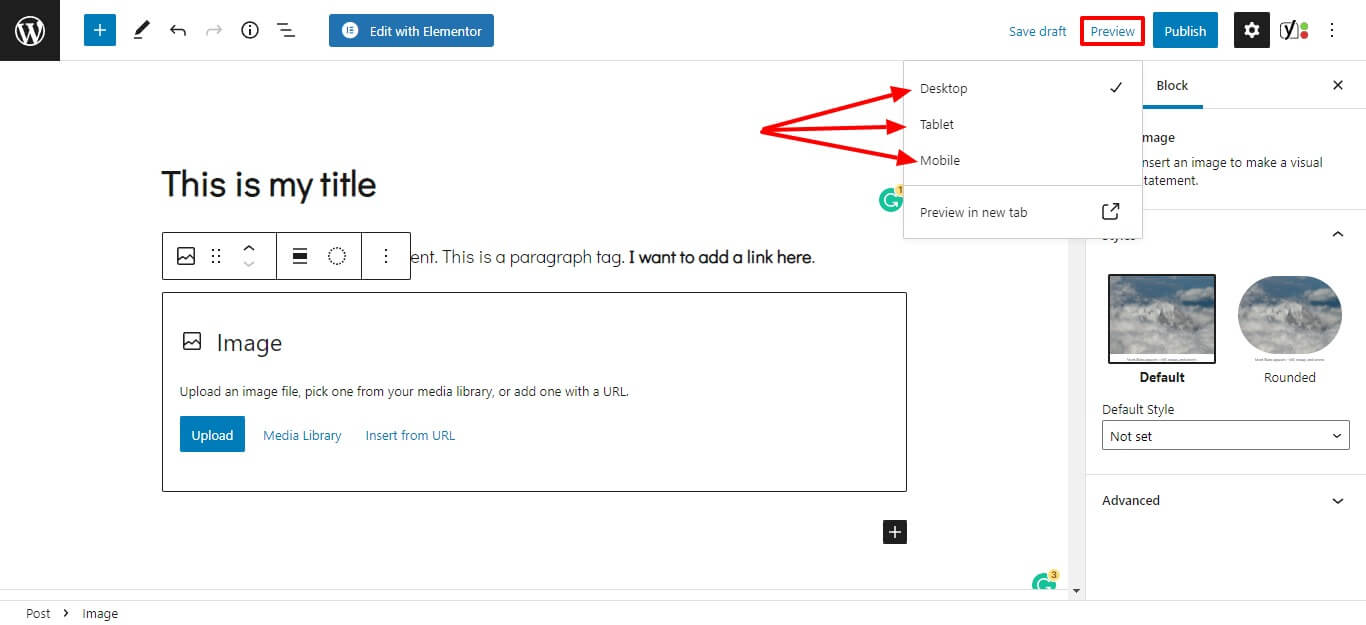
You don’t want to mess up your first blog post, and even your future posts. So make it a habit to always preview your blog post before publishing.
10. Publish the Blog Post
Now that you’re sure that everything looks good, it’s time to hit the button and make it online. You can do it by clicking on the “Publish” button in the top right corner.
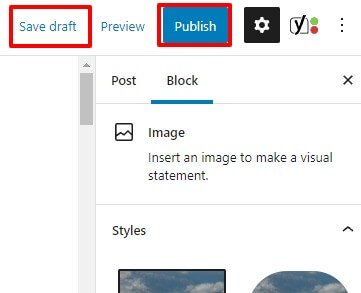
Also, the “Save Draft” button lets you save the progress you have made. But, the new WordPress automatically saves your work as you move forward.
So, have you hit the “Publish” button? Congratulations!! You just published your first blog post on WordPress!!
Next Steps: How to Write Your First Blog Post on WordPress?
So you just published your first ever blog post on WordPress. Wasn’t it easy? Okay, maybe a bit difficult. But once you start using WordPress regularly you will find it easy.
So now what? You published a blog post, is it enough? No, it’s not! Now you should keep publishing great blog posts and grow your blog traffic. To learn how to write great blog posts, check out these articles.
- How to write SEO-optimized blog posts?
- Evergreen content writing: how to write evergreen blog posts
- How to write viral blog posts?
- What is the ideal blog post length?
- 101 blog post ideas for bloggers
Also, download this free printable blog post planner that I created for you to manage and track your blog posts weekly.
So, what’s the title of your first blog post? Have you already published your first blog post? Do you have any questions about this post? Or any topic ideas that you want me to cover? Let me know in the comments below!
I hope you found this post helpful. Follow me on Twitter, Facebook, and LinkedIn. Or why not subscribe to my newsletter and get blogging and writing tips straight to your inbox every week?



Great tips here for anyone looking to get into blogging! thanks for sharing!
Thanks Fred!
Such a detailed and really helpful post for beginners. After reading this it feels easier to start blogging. Of course, publishing your very first blog post is always an exciting moment.
Thank you very much! I remember my first blog post.
There were some amazing tips in here, even for those of us who have been writing posts for years!
Katie | katieemmabeauty.com
Thanks, Katie. I’m glad to help you.
These tips are really helpful for bloggers.
These are great tips. I remember writing my first blog post. For me I was nervous but the more I posted the more confident I become.
Same here. I took more than 15 days to gather up courage to hit the publish button.
Hi, Ekta Swarnkar
Its Remarkable! Its truly remarkable post, I have got much clear idea about from this paragraph.
Thanks for reading. I know that writing your first blog post is very important and can be scary at the same time so I created this post to help you with writing easily. I hope you like other posts too.
This is super insightful for new bloggers! I know a lot of people who want to blog but are afraid of starting. Thanks for sharing x
Lynn | https://www.lynnmumbingmejia.com
Thanks Lynn! True, most people want to start but they are afraid. I always appreciate people starting a blog. I think it has become a part of my life.
Great article, well detailed.
Thanks for reading.
Awesome tips here and very informative. I really liked your post.
And Thanks for great post
Thanks for reading, I hope these blog writing tips help you grow your blog.
This content really contains some amazing information. I had made many mistakes while publishing my first blog post. If I would read the content before starting my blog, it would be great for me. I have missed these tips and highly recommend the newbies to follow these hacks to grow their audience from the root.
Regards,
Sayem Ibn Kashem
Thank you so much Sayem, I’m so glad that you found it useful for new bloggers.