Bluehost is the best web hosting for new bloggers who want to launch their first blog. Today, you will learn why, how to start a blog with Bluehost and WordPress and how to publish your first blog post.
I’ve been using Bluehost for 2 years, and I love it. Because Bluehost is a simple web hosting to use. It made the difficult parts easy so I can focus on the things that mattered.
So do you want to start a blog on Bluehost but have doubts? This post is for you. In this post, you will learn:
- Why not start a free blog
- Why Bluehost is the best web hosting for beginners
- How to create a WordPress website with Bluehost, and
- How to publish your first blog post
Want to save this pin for later?
This post may contain some affiliate links that is I may earn a small commission at no extra cost to you that I would use to maintain this blog. Thanks for understanding.
Why not Start a Free Blog?
Starting a free blog is okay if you want to blog as a hobby. However, if you’re starting your blog to either support your business or build a personal brand, a free blog won’t help.
Because free blogging platforms offer limited features and control over a website. And it’ll be hard to grow it.
With paid hosting platforms, you get full control over your website.
By starting a blog on a web hosting company like Bluehost you can grow it using premium features, monetize it, and build a successful business.
But why choose Bluehost?
Why Create a WordPress Website with Bluehost?
I’ve been using Bluehost for this blog for 2 years and it is one of my best decisions. Not only it is easy to use, but it also offers so many benefits for beginners.
- WordPress recommended – Bluehost is a WordPress recommended web hosting. And WordPress is the most popular CMS powering 40% of all websites. Bluehost with WordPress is the best option.
- Free domain name – You’ll get a free domain name for a year when starting a blog on Bluehost.
- Bluehost website builder – Design a premium website using the drag-and-drop website builder and professional templates.
- Free domain emails – Get 5 free custom emails ([email protected]) for branding.
- 24*7 customer support – You can contact Bluehost customer support at any time using three ways – call, chat, or email.
- Free SSL – Get an extra layer of security with a free SSL certificate.
- Best speed and uptime – Bluehost offers 99.9% uptime so your site loads fast and is always running.
- Free CDN – To secure your site from the cache.
- Affordable plans – The basic plan starts at $2.95 only. Plus, they offer a 30-day refund guarantee so if you’re not sure you get your money back. You’ll pay less than $36 per year with Bluehost.
Bluehost for beginners is a great option because it is simple to use and offers many benefits.
Get started with Bluehost today!
How to Create a Website using Bluehost and WordPress?
Now let’s get your blog started. In this tutorial, I’ll show you how to build a website with Bluehost. Quickly open a new tab and follow each step.
Step 1- Choose a Hosting Plan
First, go to the Bluehost signup site and choose the “shared hosting” option.
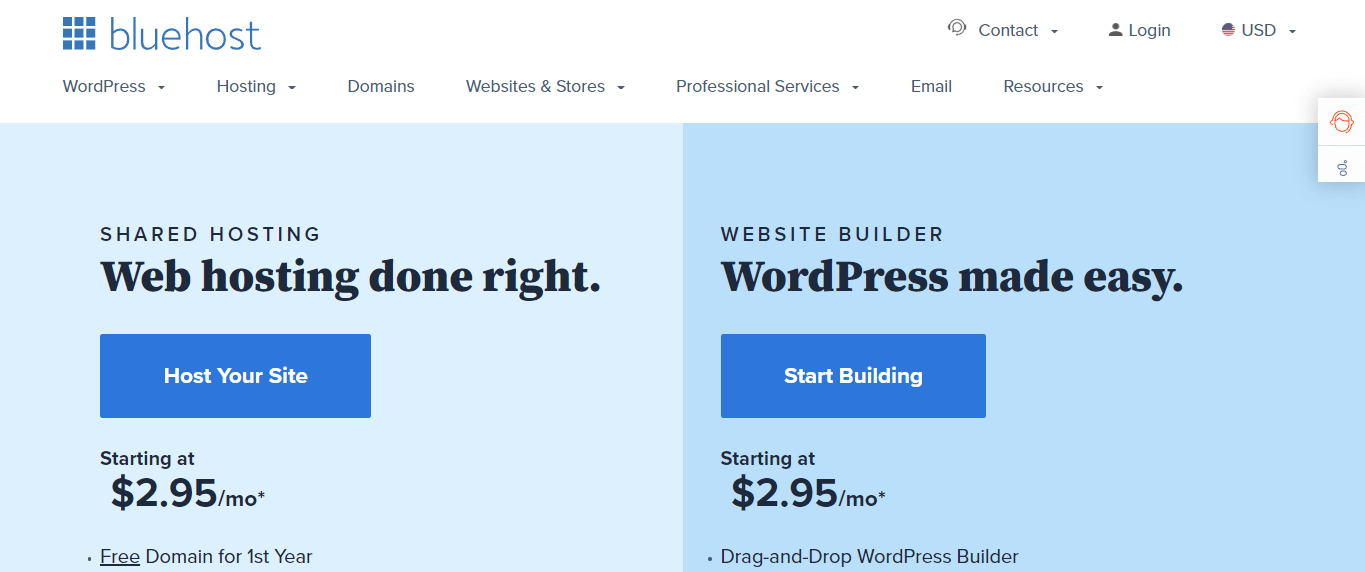
You’ll see four plans:
- Basic ($2.95/month)
- Plus ($5.45/month)
- Choice Plus ($5.45/month)
- Pro ($13.95/month)
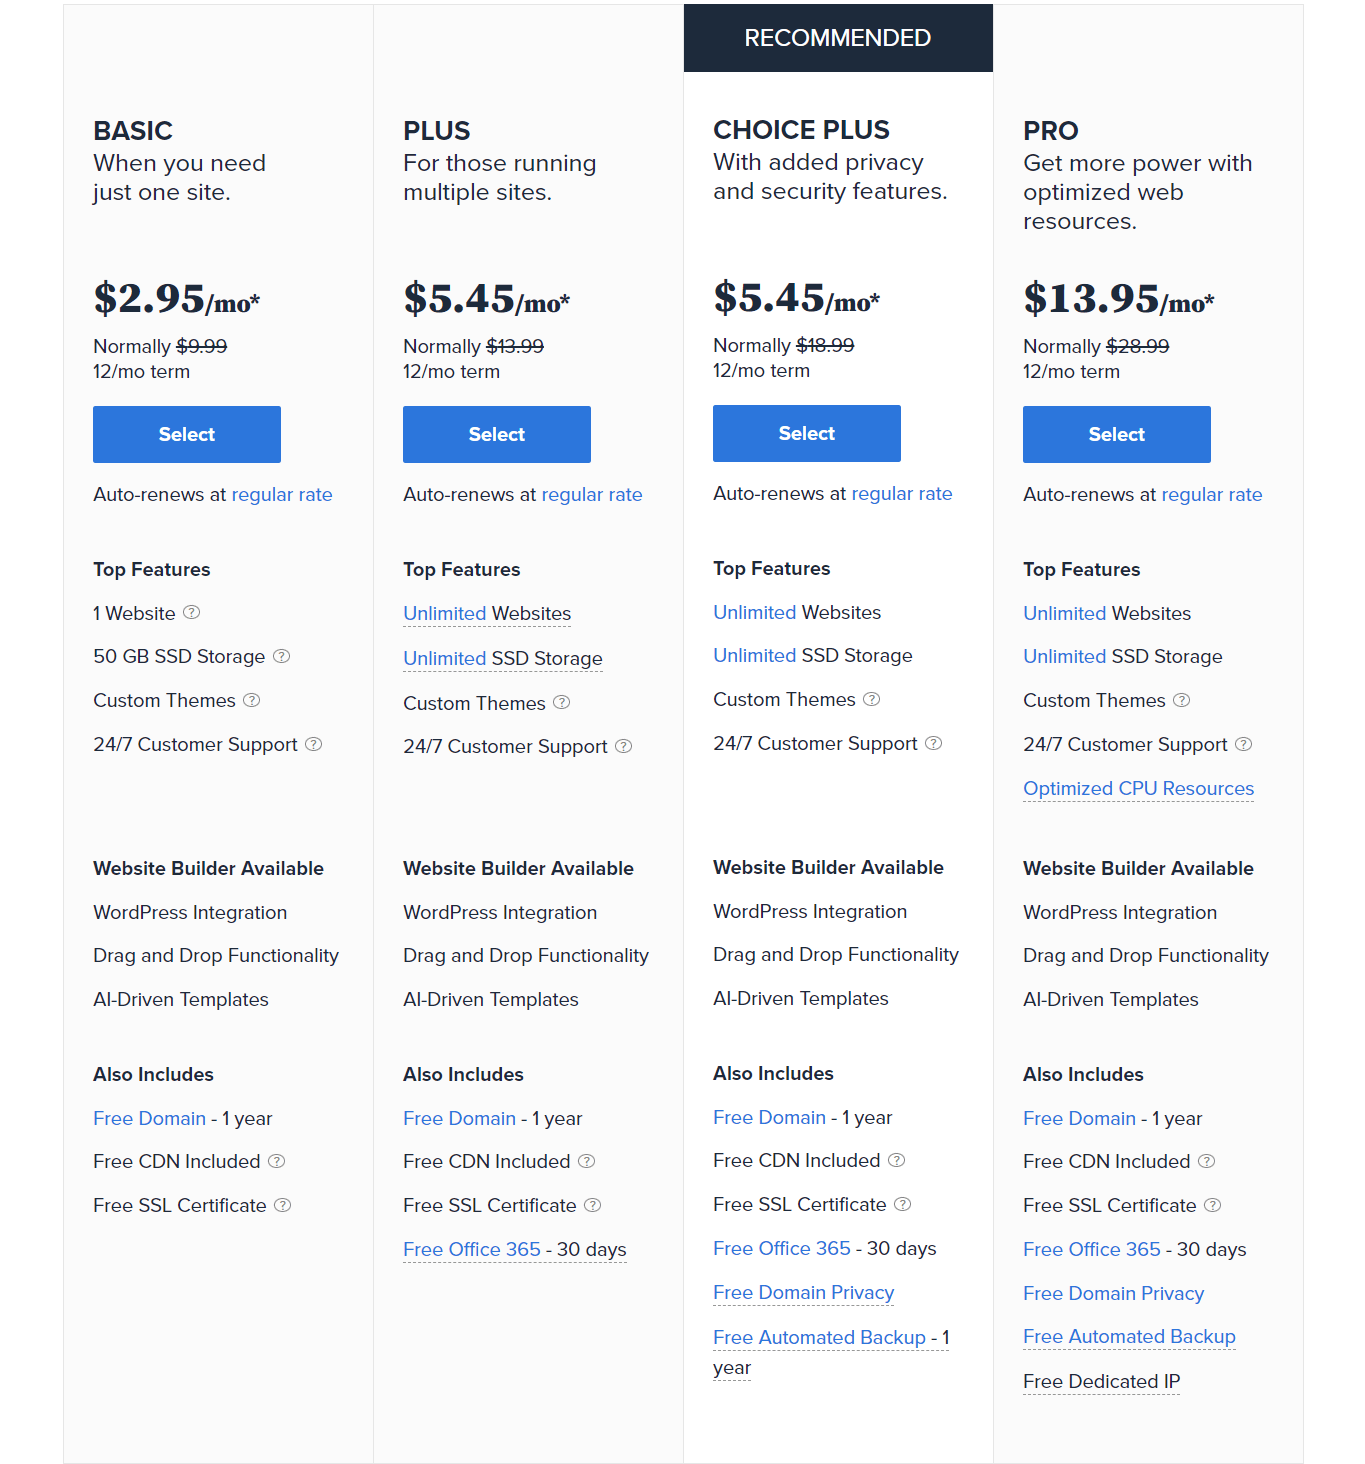
With Plus, Choice Plus, and Pro plans you’ll get advanced features. But if you’re a newbie then I’ll recommend you go with the basic plan.
The basic plan has all the important features to run a new site like space (50 GB), free domain, Bluehost website builder, and more. So, go ahead and click on the basic plan. Or you can also choose from the other plans.
Step 2- Register your Free Domain name
The next step is to register for your free domain name.
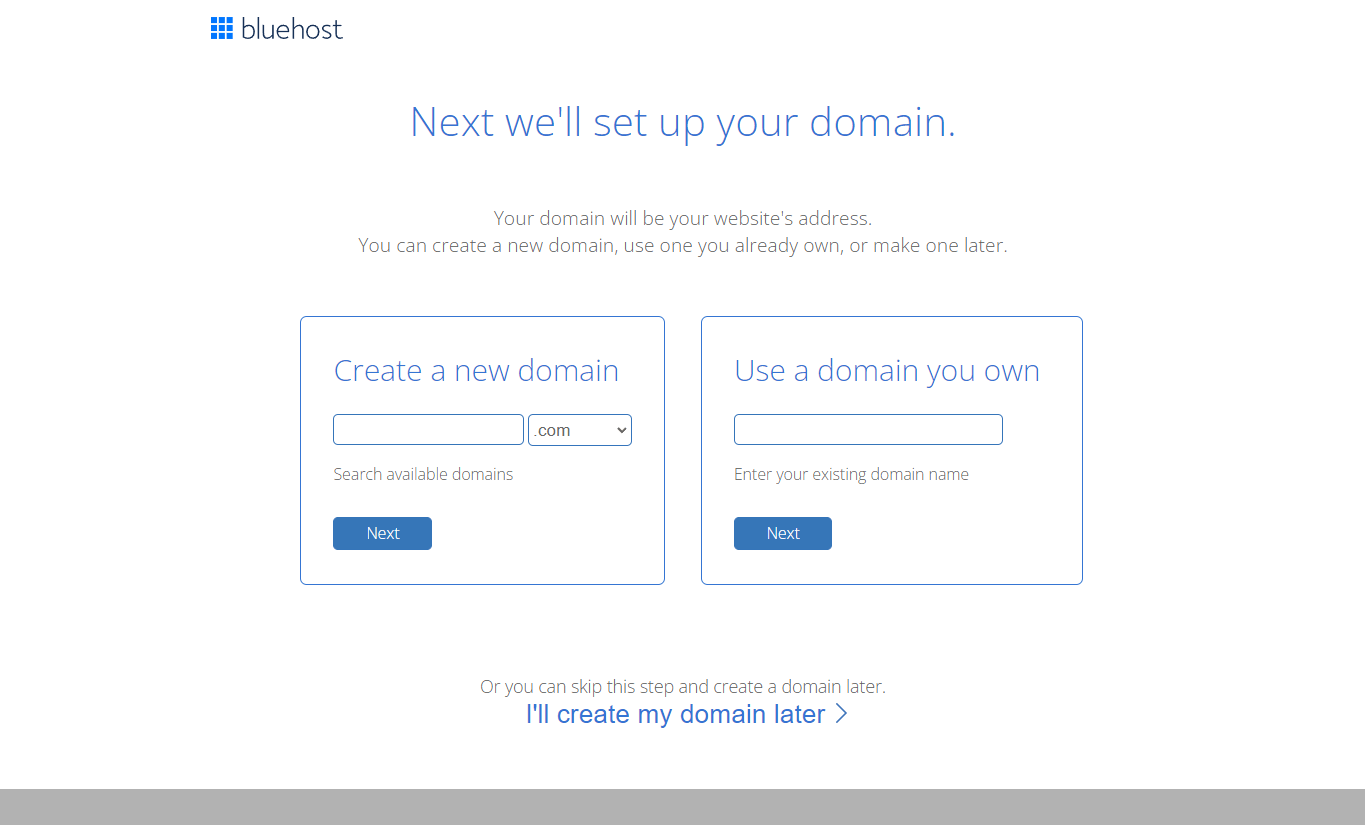
- If you have a domain name in mind then enter your domain name in the left option. And choose the dotcom (.com) extension.
- But if you’re migrating an old site to Bluehost and already have a domain name registered then enter your domain name in the right option.
- If you don’t have a domain name yet, then scroll and choose the third option “I’ll create my domain later”.
Choosing a domain name is one of the critical steps for many reasons, so if you’re not sure what to use then don’t rush. For now, start your site first and choose a good domain name later.
Step 3- Complete Application Details
Now, you will create your Bluehost account. The first step is filling in the account details.
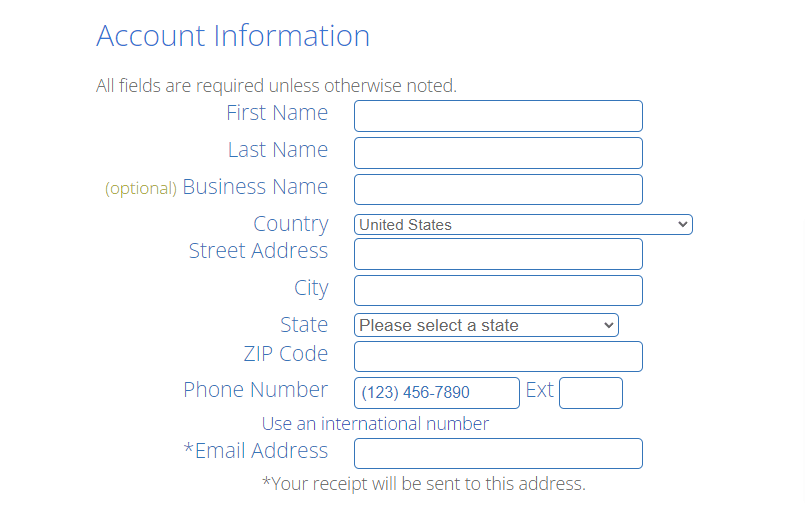
Here you will fill in your basic details like name, address, email, phone number, etc. Once you’ve filled in the account details, go ahead and complete the package information.

Choose whether you want to take the 12-month plan or the 36-month plan. Then, Bluehost offers some package extras.
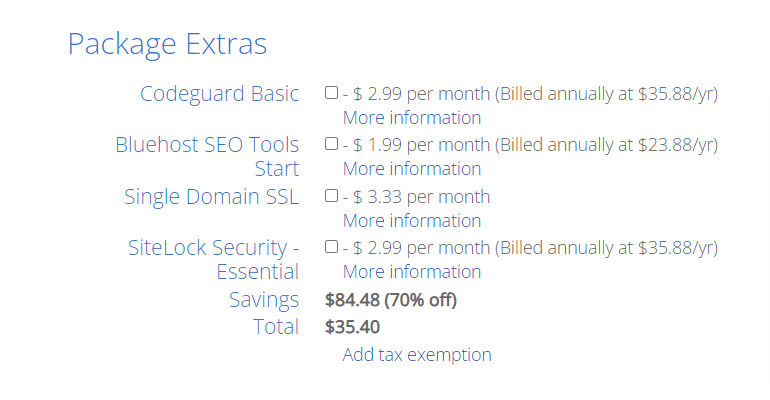
I’ve used the Bluehost SEO tools for about a month. But as a new blogger, you don’t need them. So, if you want to keep the charges minimum go ahead and untick all options. The final step is filling out the payment information.
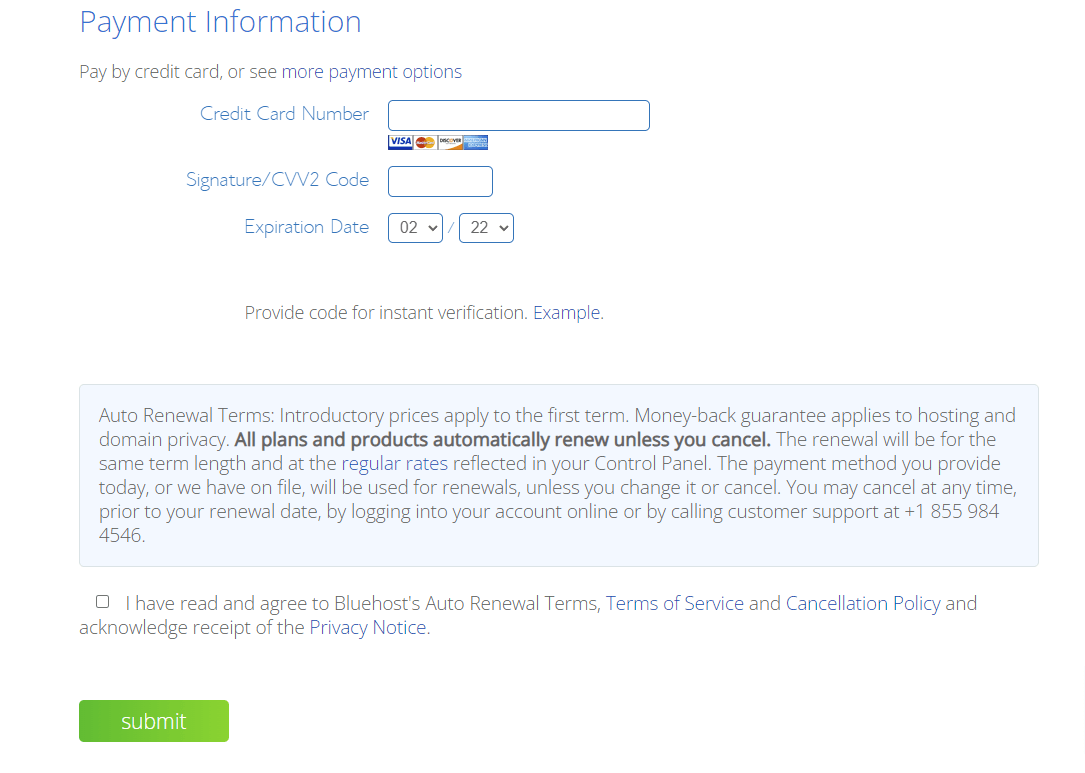
After entering your details, check the terms and conditions and click on the submit button.
Congratulations! You’ve got yourself a website, now you’re a blogger too!
In a few seconds, you’ll receive a confirmation email and a request to change your password. Quickly set up your preferred password and log into your Bluehost account.
Step 4- Install WordPress
After logging in to your Bluehost dashboard, WordPress is automatically installed on the Bluehost. You don’t have to manually install it.
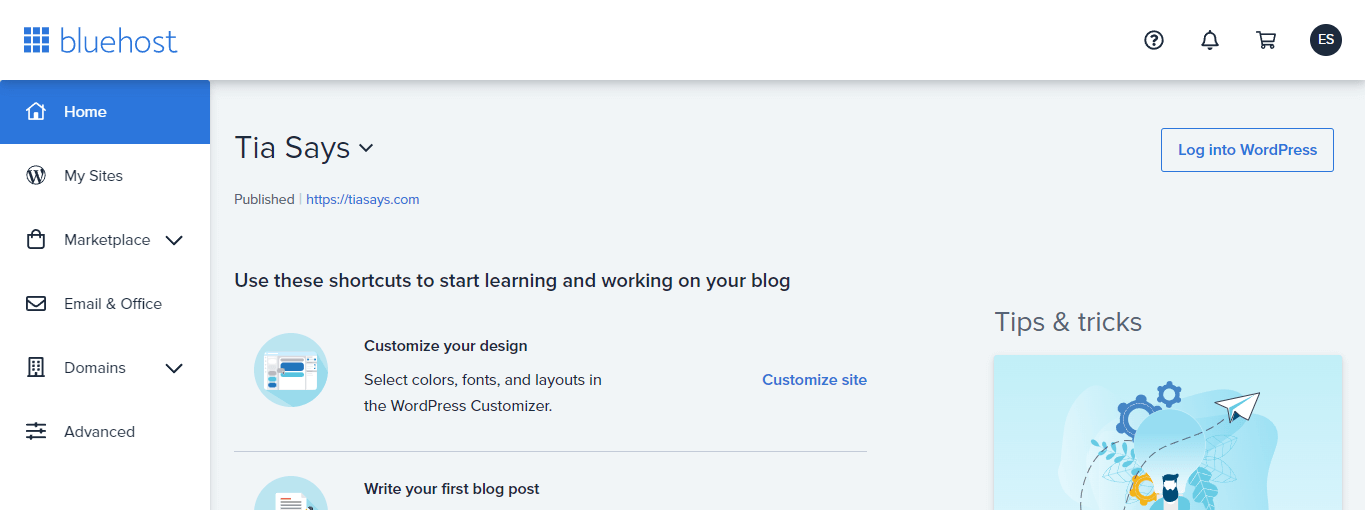
How to Launch your WordPress Site?
Let’s quickly complete a few more steps before you start creating content.
Choosing a WordPress theme
You will be asked to choose a theme. If you want to, then choose a theme or scroll and skip the step too. We’ll choose one later. Now fill in some more details.
Then you will see the login to WordPress button. So, go ahead and click on the “Login to WordPress” button. The screen in front of you is your WordPress dashboard.

Dashboard Overview
At first, the WordPress dashboard might look confusing to you. So, here is a quick overview of the dashboard.
On the left is your sidebar. The screen shows you the number of posts published, comments, and pages. My dashboard might look different than yours because I’ve some plugins installed which I got with my theme. Here’s what each option can do for you.
- Home – the main screen of your WordPress.
- Posts – is where your blog posts will appear.
- Media – is where your blog media will appear. You can add images, video, and audio files by clicking on “add new”.
- Pages – is where the additional pages show up like About, Contact, and more.
- Comments – is where you will approve, reply to, and delete comments made by your blog readers.
- Appearance – will help you modify the looks of your site.
- Plugins – is where you will install, activate and remove plugins.
- Users – is where you will modify your online profile such as adding a profile photo, social links, and more.
- Tools – you get some extra tools like site health to improve your site performance. Plus, some plugins will appear here after you install them.
- Settings – simple settings like reading and writing permission.
Changing the Permalink Structure
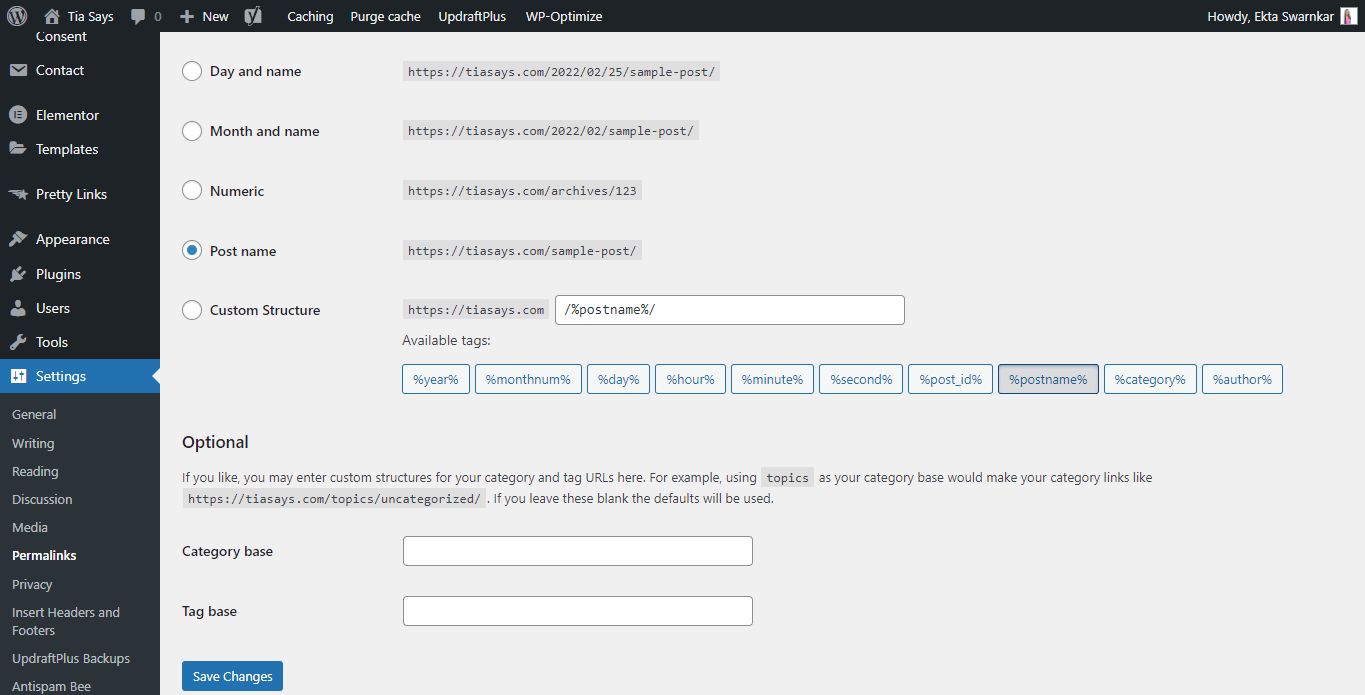
Permalink structure is how your blog post URL structure looks like. You want to have a simple structure such that it can be easily memorized. And you can’t keep changing it so it’s better if you do it before publishing any blog posts.
To change the permalink structure go to “Settings” and then “Permalink”. Then choose the “Post Name” option. And click on save changes.
Installing WordPress Plugins
Let’s now install some of the necessary WordPress plugins. Plugins add extra functionality to your site. Such that you can perform some more tasks.
To install plugins to your site hover over to the “Plugins” tab and then click on “Add New” and then on the search bar type the keyword.
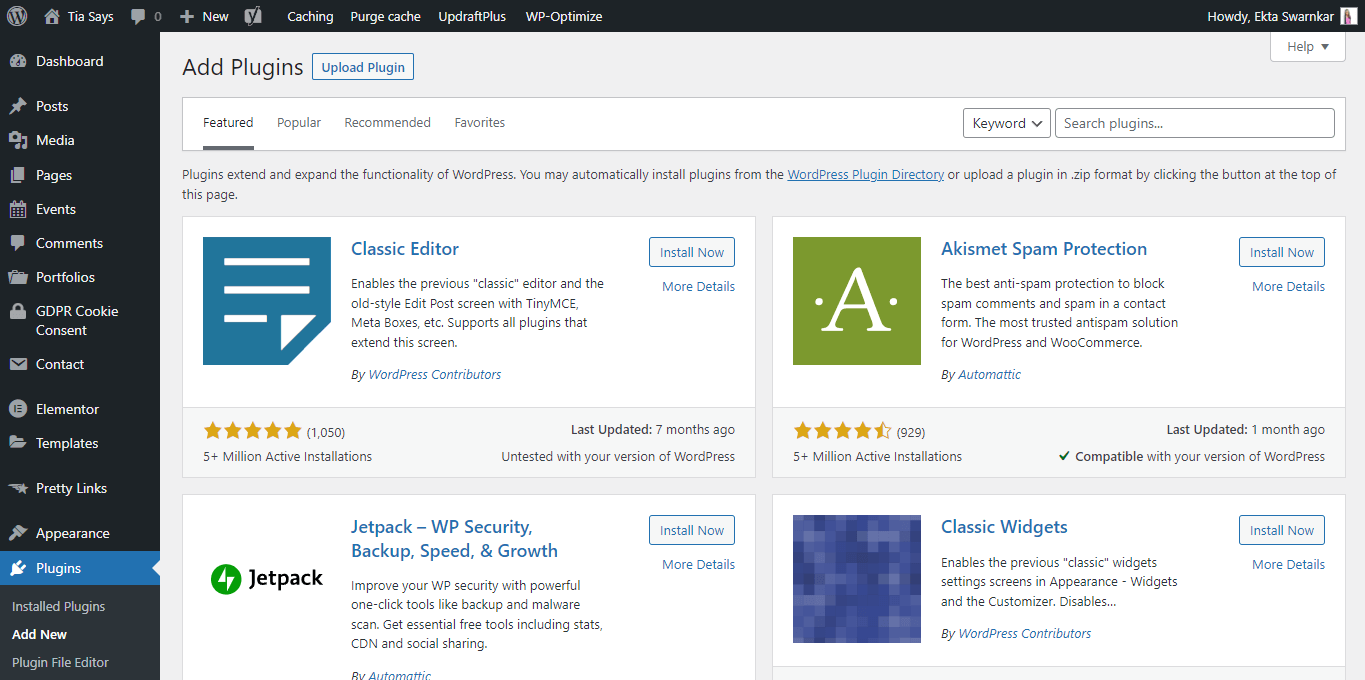
Here is the list of the WordPress plugins I recommend using.
- AntiSpam Bee – to automatically block spam comments on your site.
- Contact Form 7 – to collect your audience’s questions and queries.
- Easy Table of Contents – to display a table of contents before every blog post.
- Elementor – to design professional websites (you don’t need it if you have a Bluehost WordPress builder account).
- Insert Headers and Footers – to add extra codes to your site. Like Pinterest tag, etc.
- ShortPixel – to automatically compress images to small file sizes.
- Pretty Links – cloak affiliate links and create clean links.
- Redirection – to redirect broken links to another URL.
- UpdraftPlus – to take backups of your site.
- WP-Optimize – to clear cache and improve your site performance.
- Yoast SEO – to optimize your blog posts for SEO.
Picking the Best WordPress theme
After installing plugins, you need to choose a WordPress theme. Choosing the best WordPress theme is extremely important. Because a theme can make or break your site.
I’ve tried so many themes, I hated some, and I liked a few. So here are my recommendations for WordPress themes:
- Free – Astra theme is one of the best free themes to install on your blog. It’s fast, smooth, and elegant.
- Premium – I’m currently using the CoachPress theme by Blossom Themes. It is not only beautiful but also SEO-friendly and fast-loading.
Here are some more premium themes for bloggers.
If you want to save money then go with the free Astra theme, it will work great. And I did the same, for the first eight months.
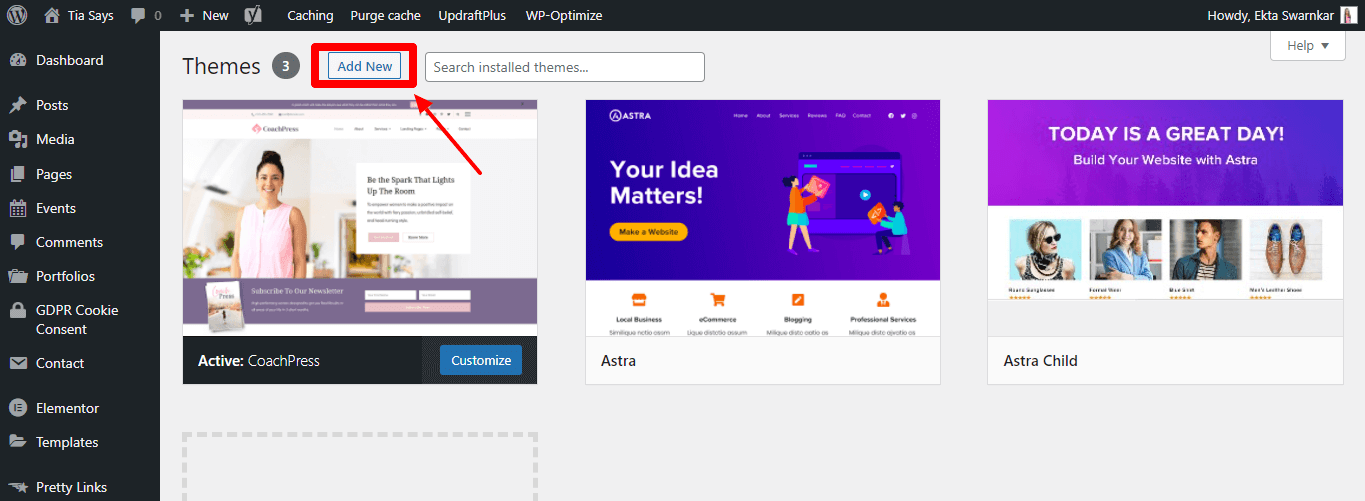
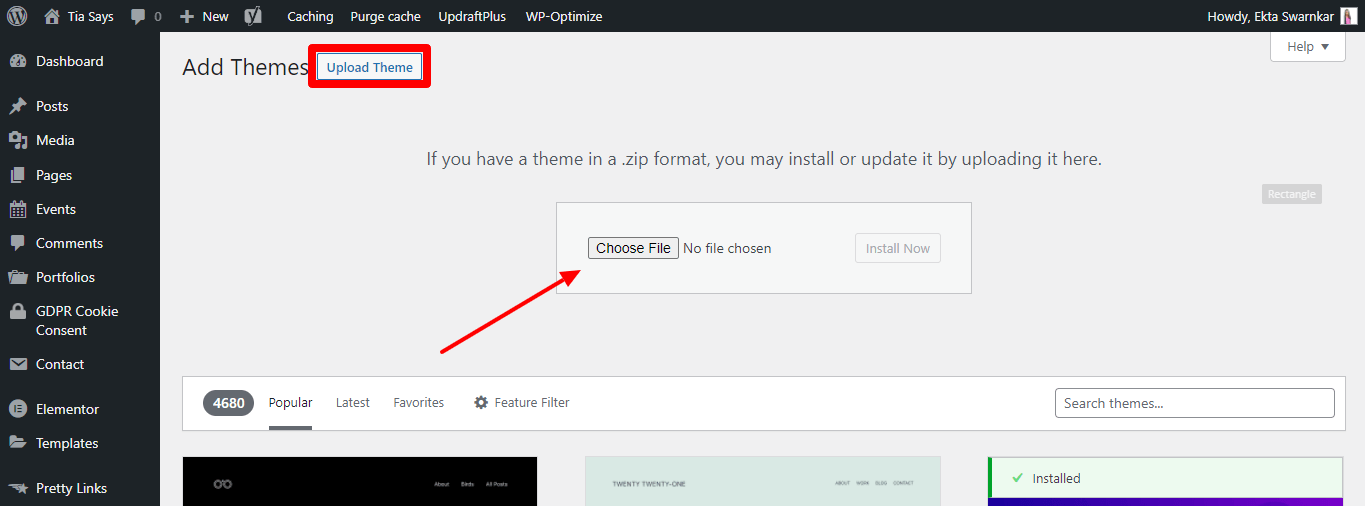
To install a theme, download the theme folder. Once downloaded, go to the “Appearance” option on your WordPress dashboard. Then click on “Themes”. Then click on “Add New”.
Now, drag and drop the zip file you downloaded just now.
You can customize your site look by clicking on the Customize option on the Appearance tab but do it later. Now is the time to get your first blog post out.
How to Write your First Blog Post on WordPress?
Hover over to the posts tab on the sidebar, then click on the Add New option. You will see this screen.
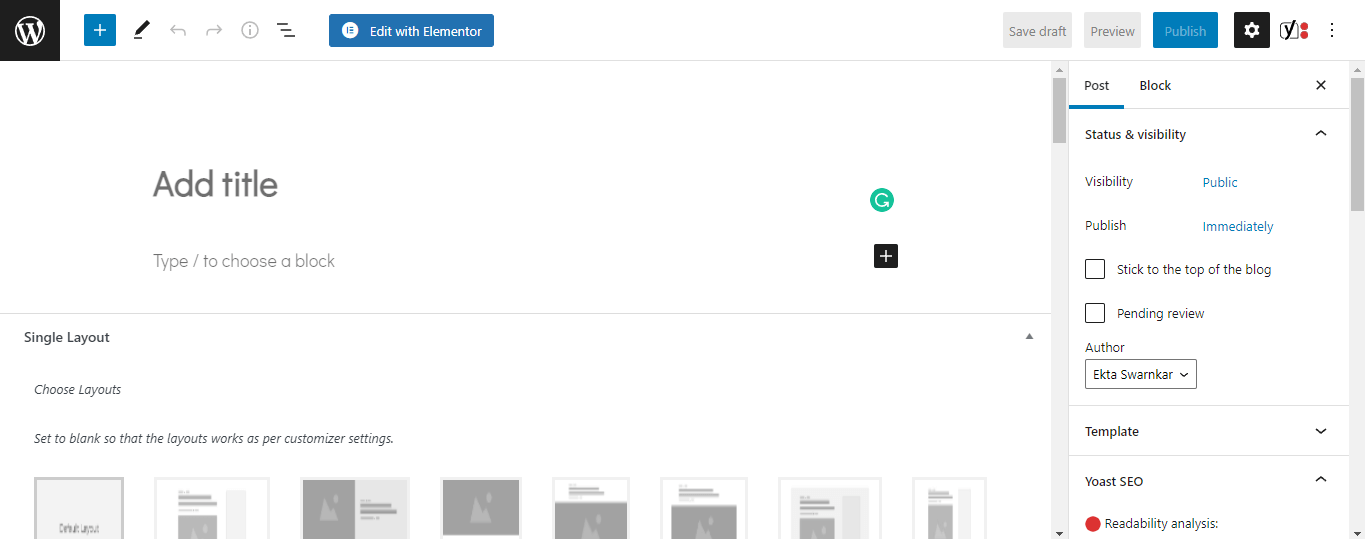
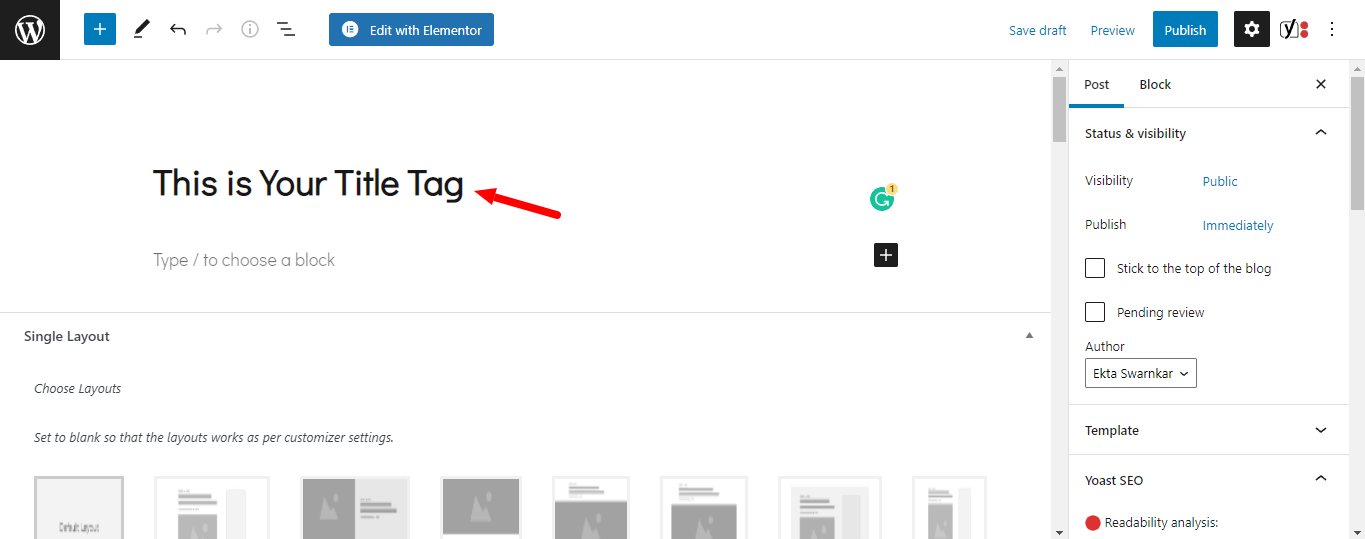
This is the title block. Here you will enter your blog post title.
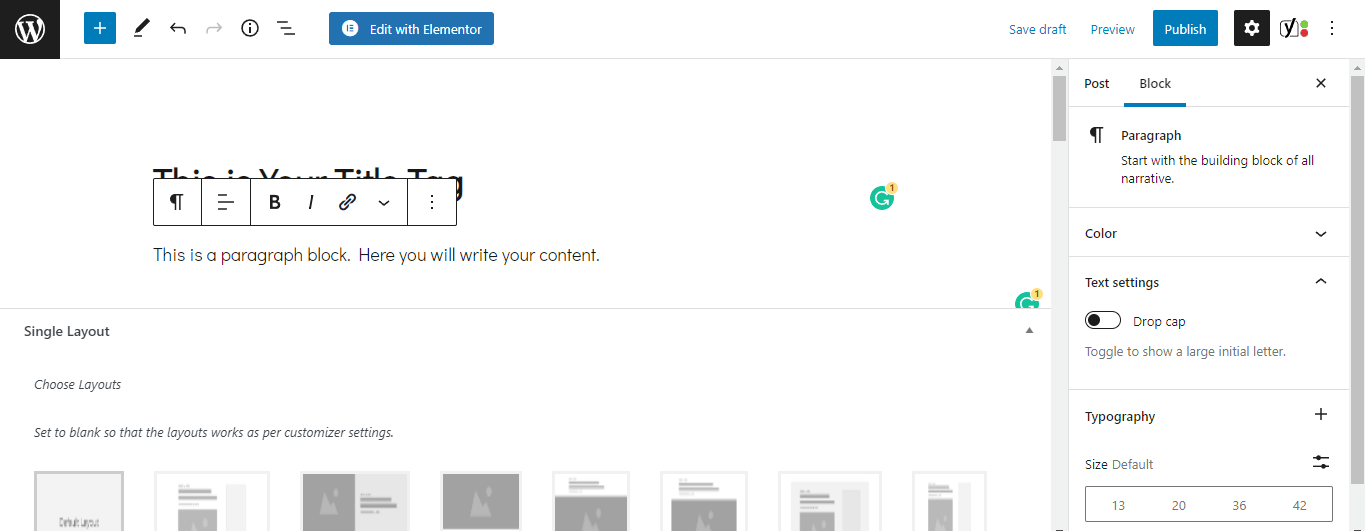
Here is a paragraph block. This is where your blog post content will go. You can also bold, italicize, underline, add links, change the alignment of the text by choosing the options on each paragraph.
By clicking on the ‘+’ icon, you can add more blocks like heading, image, and more.
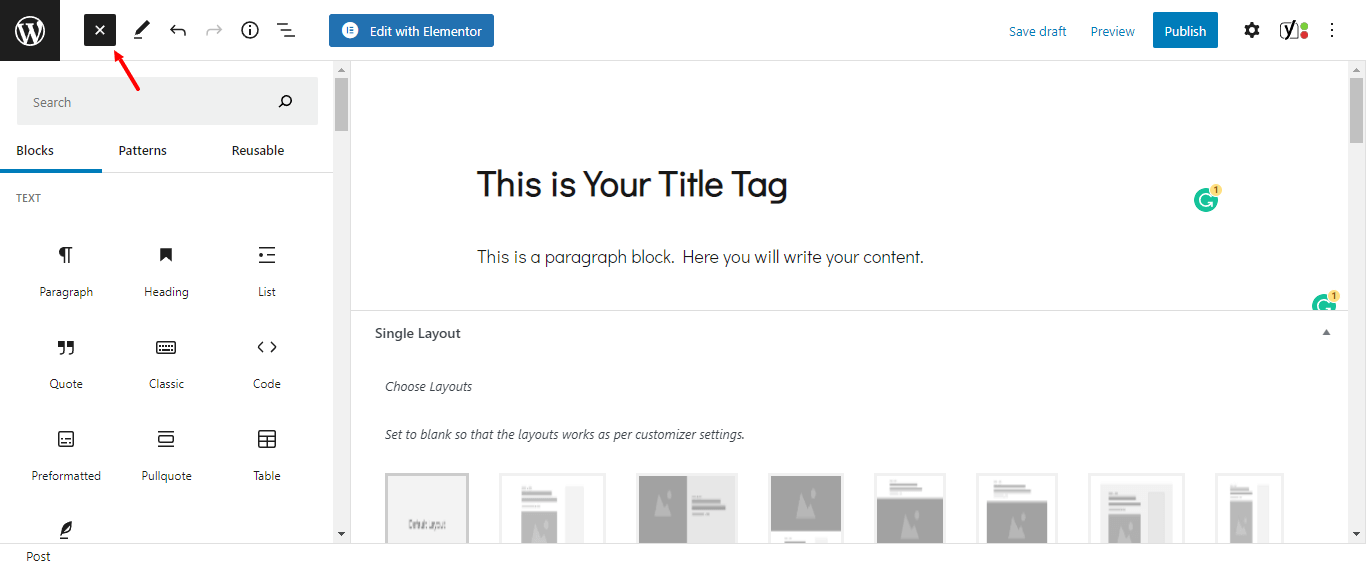
Explore more options, and write your first blog post. When it’s complete, you can click on the “Preview” button to see how it will look after it goes live.
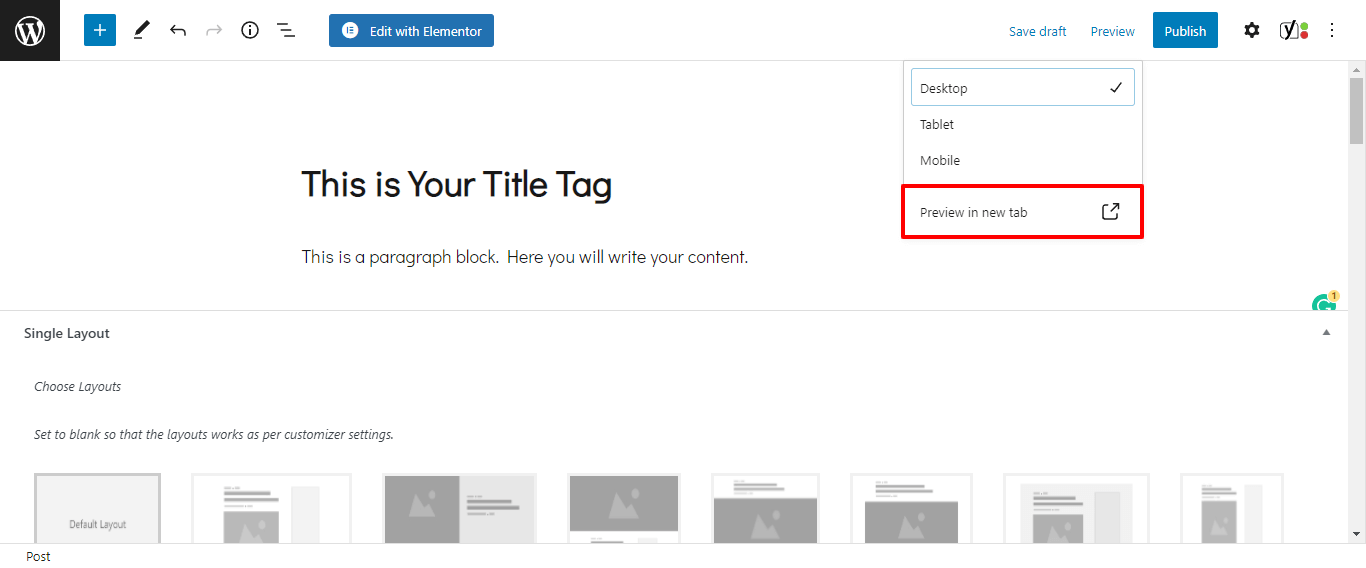
Once everything looks fine, click on the “Publish” button.
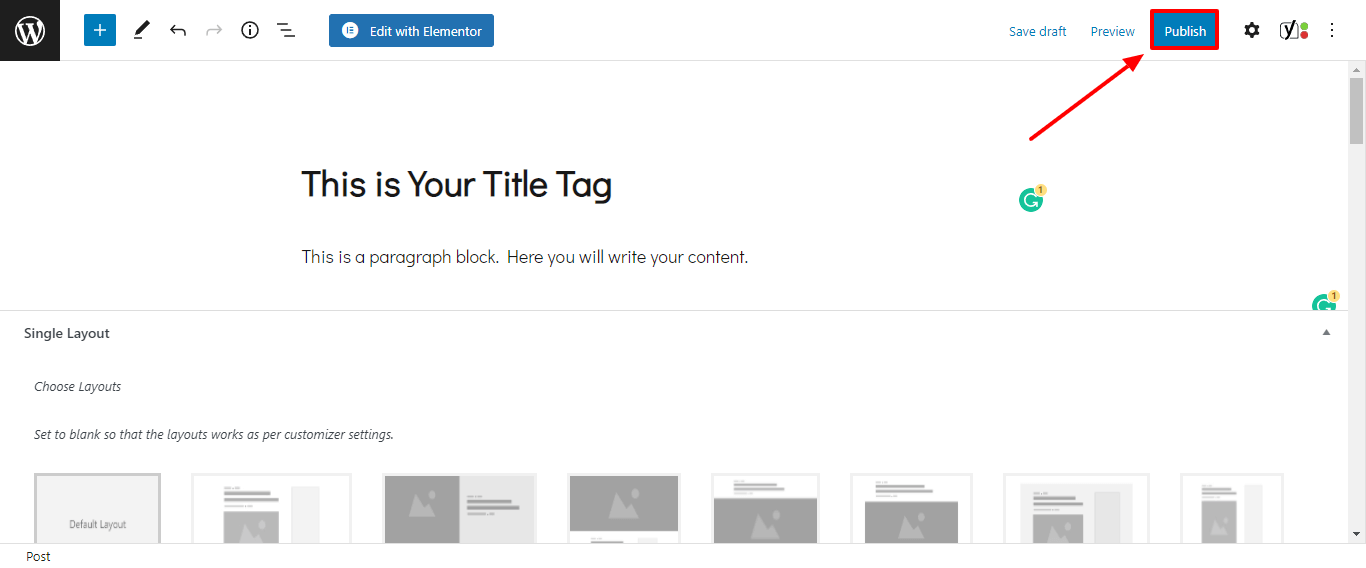
Congratulations! You just published your first blog post.
Conclusion: How to Start a Blog with Bluehost and WordPress?
So you know how to make a WordPress website with Bluehost. And how to publish blog posts on your blog.
Starting a blog is not difficult and Bluehost makes it easier and faster. It offers so many benefits.
So what should you do next? If not already, then start a blog on Bluehost now and publish your first blog post.
If you’ve started a blog already then create a blog content plan and start building your blog.
Have any questions? Put them in the comments below. Or tell me, is this your first blog? Have you decided what to name it?
I hope you found this post helpful. Follow me on Twitter, Facebook, and LinkedIn. Or why not subscribe to my newsletter and get blogging and writing tips straight to your inbox every week?
Download this free blog content planner to create a content plan for your new blog.
More resources to check out:



So thorough and super helpful for the new bloggers! Well done 🙂
Thanks, Mary Glad you liked it!
This was very informative!
Thanks for sharing 🙂
Thanks Amara.
A very helpful post! This is a starting point for a new blogger.
Thank you. Exactly! and a new blogger must pay attention to this.
Thanks for writing this. I already have a WordPress.com blog. I plan on switching to bluehost but there’s a small fear in the back of my mind that all my current content will not switch over when i do. I wish i could have a bluehost customer service rep next to me while i switch over to make that I’m doing everything correctly. I’ve worked too hard to lose everything I’ve written.
Hi Tameka!
I think you can contact bluehost support through the chat and call option. I’m sure they will be happy to help you set up your blog.
Well Optimised and informative article.
Thanks Abhishek! I’m glad you liked it.