As a blogger, an email list is your biggest asset. That’s why you should start building an email list from day one. Not sure how to create an email list for your blog? Here’s a step-by-step guide for you.
I get it, in the beginning starting and managing a blog is too much that you don’t want to get into email list building. But that might be your biggest mistake. As it was mine.
Although I had set up an email list I never paid attention to growing it. And I lost a lot of potential subscribers. So, I don’t want you to repeat my mistake.
You must start setting up an email list now such that you automatically add subscribers as you drive traffic to your blog.
So, how to create an email list for your blog?
To create an email list for your blog you need to find email marketing software. However, it takes a lot more than that. Here are the exact steps you should follow to build an email list from scratch.
- Create an email marketing strategy
- Create an option freebie to offer
- Choose an email marketing software
- Set up your email marketing account
- Create an optin form
- Set up automation
- Place the optin form on your blog posts
- Drive traffic to your blog posts
Follow along with this guide if you want a step-by-step explanation of how to build an email list for your blog with screenshots.
Want to save this post for later?
This post may contain some affiliate links that is I may earn a small commission at no extra cost to you that I would use to maintain this blog. Thanks for understanding.
Okay, let’s begin.
Why Start an Email List for your Blog?
I know I haven’t quite answered the question: why do you need to start building an email list as soon as possible. That’s why here are the best reasons to do it.
Connect with your Readers
If you say your email list subscribers are your first loyal followers you’re not wrong. Because they’re a lot more connected to you than blog visitors.
As a blogger, you can share your personal stories with your email list. They get to know the real you. You will chat with them more often, get replies from them and build a stronger relationship. In return, they will trust you and become your truest supporters.
Understand your Readers
Using emails you can get closer to your target audience. Yes, you might have created an imaginary target audience profile but that’s not a real person.
The real person is on your email list. So, if you keep interacting with your subscribers then you will start understanding them better. Such that you will write better blog posts personalized for your email list.
This way, the blog posts will attract readers similar to your email list. They will leave comments and share the blog posts with others. And in time, you will compound this engagement and get other rewards like better Google rankings and more social media engagement.
Own your Email List
The best part about an email list is that you own it. It is yours, you can do whatever with it, and you can never lose it.
However, other parts of the target audience such as social media followers are not completely yours. For example, if Facebook decides to block your Facebook page, there’s no way to reach the followers. But if something happens to your email marketing software you can always export your email list and move to a different tool.
Monetize your Email List
I made my first blog income through email marketing. It was an affiliate sale. I was promoting a blogging resource. So, in short, having an email list from the beginning is a great way to start making an income.
There are many ways to make money from your blog but monetizing an email list is the most effective. Because email subscribers are action takers. They’re already nurtured and trust your recommendations. If you recommend a product that they genuinely need you’ll get a sale.
So, you see there are many benefits of starting an email list. Now, let me walk you step-by-step on how to set up an email list for your WordPress blog.
How to Start an Email List for a Blog?
Starting an email list is as simple as picking an email marketing software and creating an account. But, if you want to drive results then you need to see it strategically. That is, you need to start with building a strategy.
STEP 1: Create an Email Marketing Strategy
Think for a while, why do you want to start an email list? What is the goal? Need help? Here are some reasons to start an email list:
- Drive traffic back to the blog
- Grow blog income
- Understand target audience
- Nurture them to buy your products in the future.
You can have one goal or more. Just have it set up clearly so you send purpose-driven emails. For example, if you want them to read your newly published blog post then send an email with a link to the new post. To understand your audience, conduct surveys.
The next step is to decide how often you should send an email. If you send too many emails they might unsubscribe but if you send too little they might mark you spam. So, you need to send a healthy number of emails such that they’re not irritated but remember you.
For example, I send an email once every week. Sometimes I skip a week and sometimes I send two in a week. But I never miss more than once. The trick is to not let them forget you. Create a consistent schedule and follow it.
Once you decide how often you’ll send an email the next step is to create a freebie.
STEP 2: Create an Optin Freebie to Offer
But, what is a freebie? A freebie is a content upgrade that your target audience is interested in taking because it solves one of their problems. So, when you give it to them for free all they can do is sign-up for your email list and get the freebie.
Now, why create a freebie? You will create a freebie to give blog visitors in exchange for which they give you their email addresses and become your subscribers.
Giving a freebie is a better way to build an email list of interested subscribers. Because only those people who are interested in your freebie will subscribe.
What type of content upgrades work the best?
The best content upgrade is something that fixes a major problem for your readers. It should be strong enough to make their lives easier after using it.
In your blog, you’re solving many problems for your readers. Similarly, you just have to find a bigger problem, create its solution and offer it as a freebie.
For example, if you’re a food blogger who teaches vegan recipes to your readers then your freebie should be something that helps them try these recipes such as an ebook on how to use kitchen appliances.
Your readers will want to take it because it teaches them how to use that kitchen appliance so they can try making these recipes at home. They will become your subscribers easily because you’re solving a problem for them.
How do you find what problem your blog audience has?
Before creating a freebie you must know these two things:
- Blog niche: make sure that the freebie is in your niche. You cannot create a mini-course on workout exercises for fitness freaks and expect to add subscribers from a food blog.
- Target audience: make sure the audience you target will be interested in taking the freebie. Don’t create a checklist for middle-aged moms if your blog is filled with blog posts on college tips for teenagers.
Here are a few ways to find an idea to create a freebie.
- Read blog comments to find questions they ask.
- Facebook groups where your target audience hangs out will give you a lot of ideas.
- Conduct surveys to ask what they would want to learn.
- Read Quora threads and subreddits to get some ideas.
For example, I once did a poll on my Facebook group on what would they want to learn: SEO blog writing, how to find a target audience, or blog commenting?
I got the maximum votes for “SEO blog writing” so I created an ebook to sell. And, I got the second-highest votes for “how to find a target audience” so I created a target audience persona as a freebie and gave it to my blog readers.
Now once you figure out the freebie idea the next thing is to find out the right content format.
What type of freebie should you create?
Pick a content format that makes it the easiest way to deliver the information. Here are some formats that you can consider:
- Checklists
- Cheatsheets
- Ebooks
- Email courses
- PDFs
- Free training sessions
- Templates
How to create a freebie?
You can create amazing freebies using Canva. It has templates for everything such as checklists, cheat sheets, etc. Just pick a template, put your text and modify it the way you want.
STEP 3: Choose an Email Marketing Software
So you have a freebie to offer, now let’s pick email marketing software from which you can send emails in bulk.
You might be wondering if you can use a Gmail account for this. But, it can’t be used for sending bulk emails. In the beginning, your list might not be big but as you keep adding new subscribers it will become difficult to manage. So, you will be moving to email software.
Plus, email marketing software offers advanced features such as segmenting, testing, analytics, etc that Gmail does not. There will be no proper tools to grow and manage your list. It’ll make your life a bit more complicated.
So, it’s always better to pick the best email marketing software from the beginning to avoid moving later. There are many tools available, both free and paid options.
Which email marketing software is the best for your blog?
I use and recommend Mailerlite. It has many reasons (that I’ll tell you below) but most importantly because it’s beginner-friendly, free, and gets the work done.
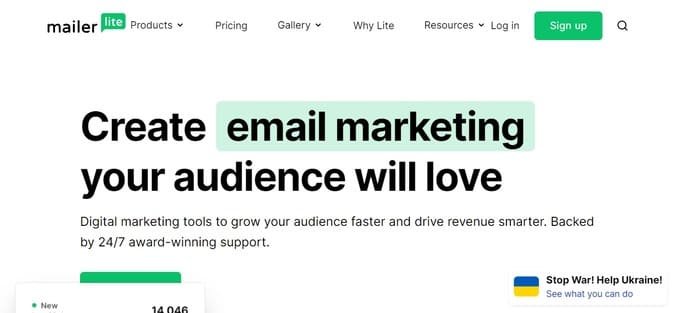
I recommend Mailerlite to all new bloggers because it isn’t complex. It’s a perfect tool to experiment with also because of these features.
- Mailerlite is free for the first 1000 subscribers.
- It has free pre-made templates.
- You get free access to Analytics.
- It has A/B split subject line testing.
- You can create responsive emails.
- It allows you to segment subscribers.
Sure, when I was new I didn’t care much about other features but I needed a simple tool. I first picked up Mailchimp and instantly regretted my decision. It may be a wonderful tool but it isn’t beginner-friendly.
So, I moved to Mailerlite and have been using it ever since. It’s free for the first 1000 subscribers, which is a lot so it’s worth trying it. That’s why I recommend you use Mailerlite too.
STEP 4: Set up your Email Marketing Account
To create a Mailerlite account click on the link.
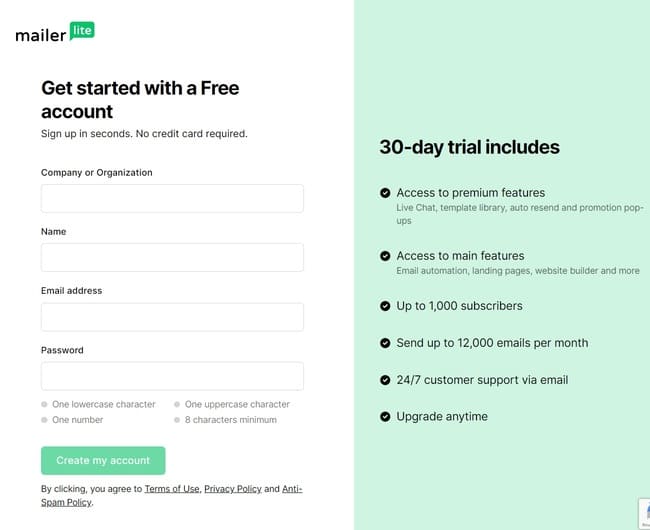
Now, click on the “Sign up” button. On the next screen, enter the asked information and click on create an account. You will see your dashboard. Now, you will be asked to verify your email address. For that, you will have to click on the verification link sent to the email address you used while signing up.
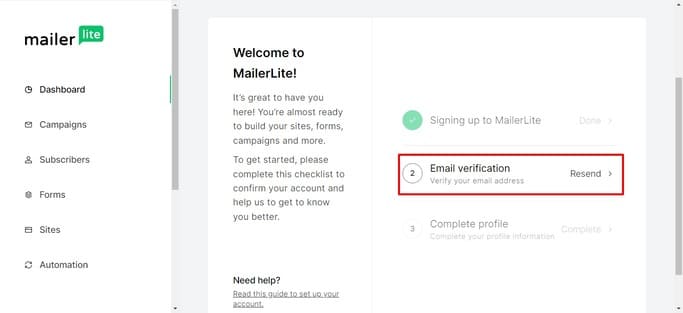
Now, the final step is to complete your profile. They will ask you to fill in some information like your website address (for getting approval, it’s an important step), etc. So, go through the steps and finish the process.
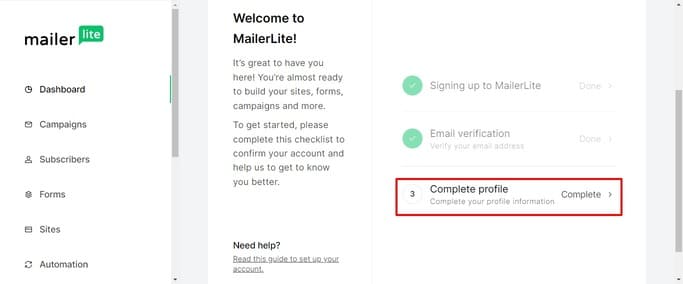
It might take a few days to get your account approved. Once approved you can use it.
Until your account is approved, bookmark this page and come back later.
STEP 5: Create an Optin Form (Landing Page)
Now, to collect emails you need to create an optin form. Here’s an example of an optin form that I use to give my free blog planner in exchange for their emails.
You can also create one by going on the “Forms” tab on the Mailerlite dashboard. From there, click on “Create Embedded Form.”
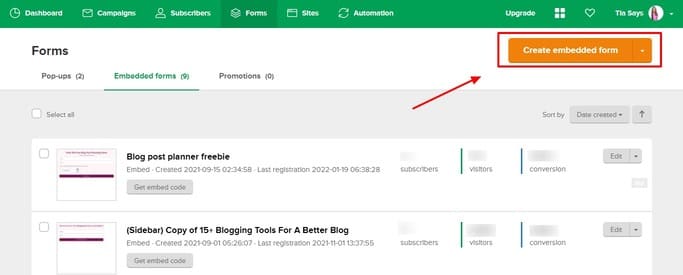
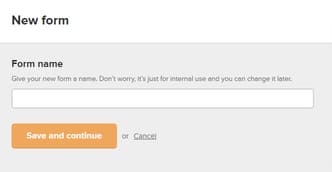
It will ask you to give a name to your form. Do it and click on “Save and Continue.”
Now, choose a subscriber group. Since this is your new account, you will have to click on “Add new group.” This is a group of all those subscribers who will sign-up for this form. Name your subscriber group.

This screen is where you can customize your form design. Use the elements and setting in the right sidebar to design a form.
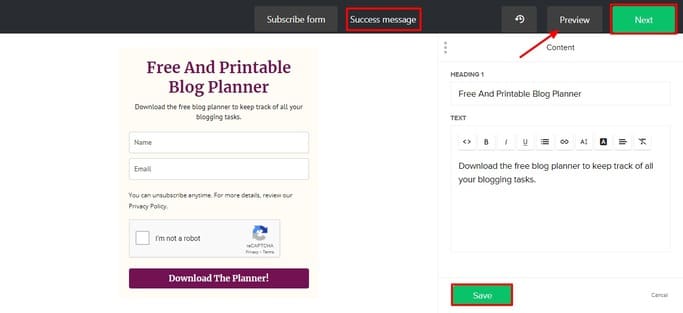
Don’t forget to edit the “Success message” and when you’re satisfied with the design click on the “Preview” button to see how it looks. Then, “Save” (bottom left) and then “Next” (top right) to move to the next step.
Congratulations! You just created a sign-up form using Mailerlite. You will share this form with others to get sign-ups.
STEP 6: Set up Automation
Now, your subscriber has used the sign-up form and given you their email address. It’s your turn to deliver what you promised, that is the freebie. For that, you need to set up automation.
Automation is the automatic email sent to the new subscribers as soon as they sign-up using the form. It can be one email or a series of emails.
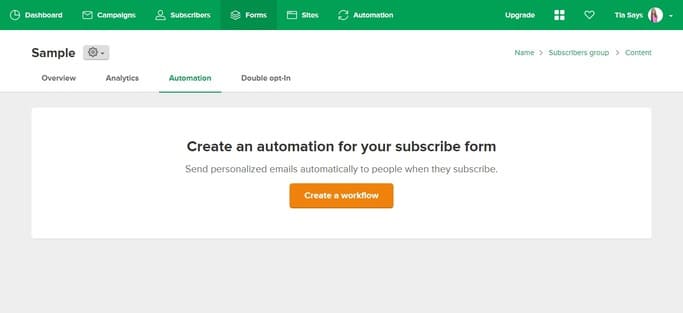
To create automation for this form go to the “Automation” tab on the form settings. Now click on the “Create a Workflow” button.
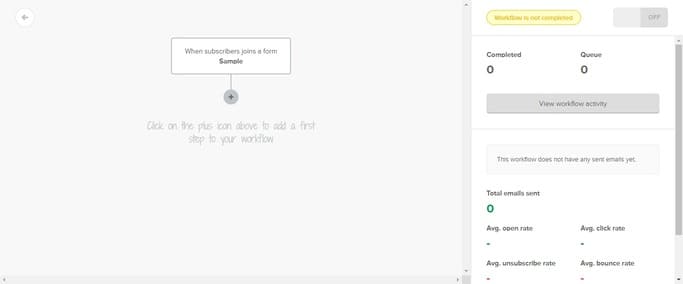
This screen is where you edit the workflow. To add your first email click on the little “+” icon.
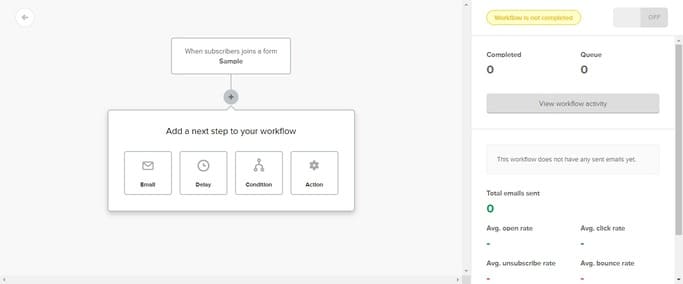
You can choose from four different options: email, delay, condition, and action. To add an email choose the “email” option.
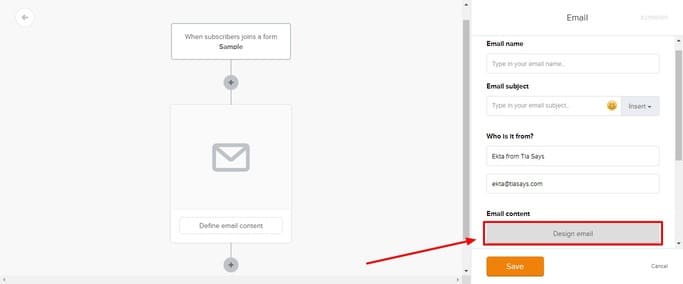
Fill in the spaces with appropriate details and to write the email click on the “Design Email” button.
Then, choose the type of editor you want to use. If you’re a non-techie like me, then pick the “Drag & Drop editor”.
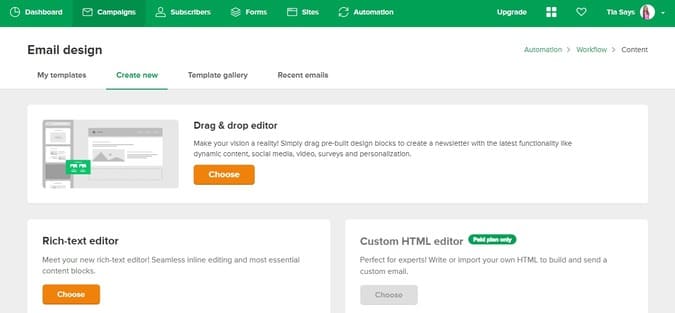
You will be able to add your content here.
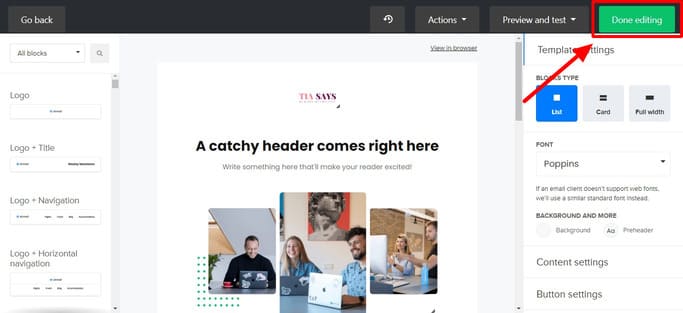
Make sure to write an introduction type of email and include a link to download the freebie.
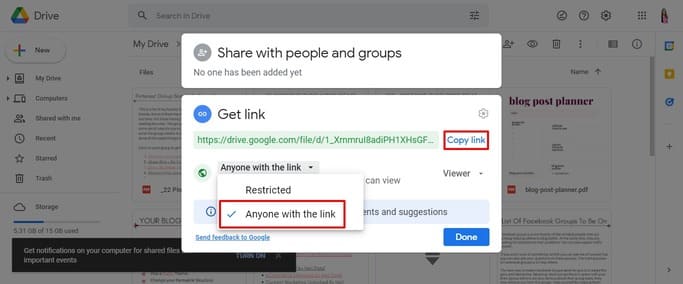
To get a downloadable link, you can upload the freebie material on Google Drive, change the permission to “everyone with the link” and then copy the shareable link.
Once you’ve written the email click on “Done Editing” and on the Workflow dashboard, turn on the push button to make it work.
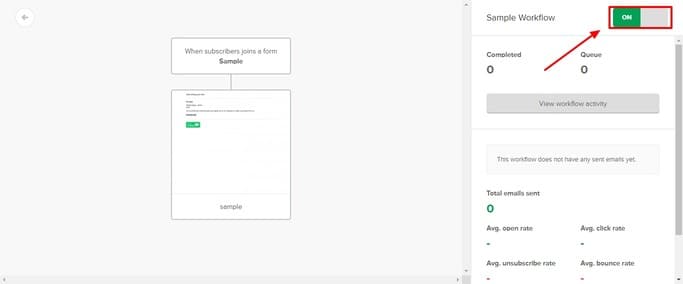
Congratulations! You created automation. Now, whenever someone subscribes using the sign-up form this workflow will trigger automatically.
Obviously, it was sample automation, you can create a more complex series by adding more emails and conditions. So play around and use different features to create highly targeted email automation.
STEP 7: Place the Optin Form on your Blog Posts
Now, all the work is done, what’s left to do is to embed your sign-up forms in blog posts so whenever a reader reads it and sees the sign-up form, he also subscribes to it.
To get the embed code, open the form and then scroll down to the bottom of the page. Get to the “Embed form on your site” option and click on the “HTML code” option.
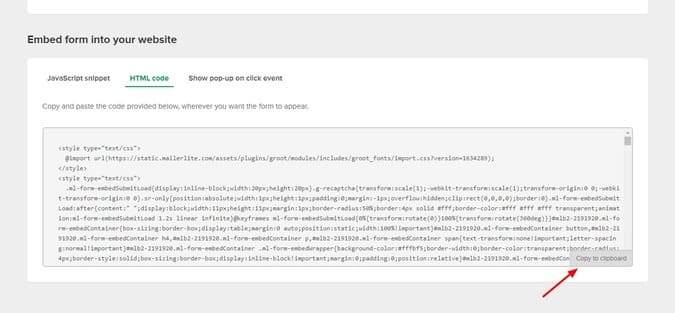
Now, copy the code. To paste the code into your blog posts, you will have to open the WordPress editor. Now, add an “HTML” code option and paste your code here.
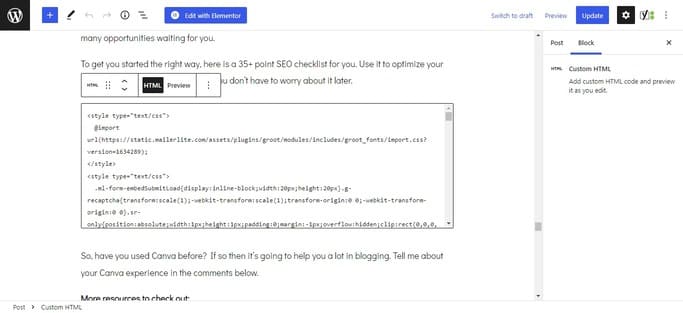
When you click on the “Preview” button (on the HTML block) you can see the form. Once you see that your form is displaying correctly you can update the post.
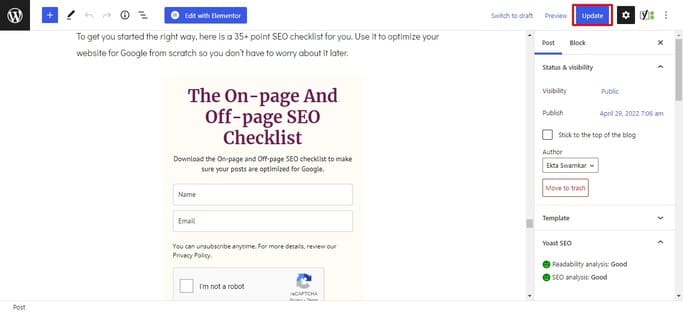
So, go ahead and add your sign-up forms on blog posts that you think are relevant for the freebie.
You can also create multiple freebies to offer in different blog posts. This way you can collect more subscribers than normal.
But the work isn’t done yet…
STEP 8: Drive Traffic to your Blog Posts
Unfortunately, adding sign-up forms won’t get you sign-ups automatically. For that to happen you will need to send visitors to these blog posts. Once they read the blog posts and notice that you have more to offer them for free, they will sign-up and become your subscribers.
Luckily, you have automated almost every part of email marketing. Now, all that’s left to do is to get as many visitors as possible.
So, check out these blog posts to drive blog traffic:
- Effective tips to grow blog traffic
- Best ways to promote your blog posts for free
- Blogging tips to optimize your blog for more traffic
- SEO tips & quotes from pro bloggers
- Why your blog is not getting traffic & how to fix it?
- How to use Pinterest to drive traffic?
Apply different strategies from these blog posts and you will be able to grow your blog traffic. So, this is how to set up an email list in a WordPress blog using Mailerlite.
How to Grow an Engaged Email List Fast?
Now, driving traffic isn’t the only way to grow your email list subscribers. There are some other ways to build an email list fast. But adding subscribers to your list and building an engaging email list are two different things.
If you want to get all the benefits of having an email ist then you should focus on nurturing them so they become engaged in your content. Otherwise, they will either not know you or not like you. Here are some tips to build an engaging email list:
1. Write Personalized Emails
Personalized emails are great for getting a subscriber to engage in your content. This is the number one tip for writing great emails. For example, I have noticed that emails with subject lines with names have got higher click rates than normal emails.
Some other ways of writing personalized emails are:
- Sharing a personal story
- Conducting surveys and optimizing your emails
- Sending helpful tips and tricks regularly
- Responding to their replies
- Asking them questions
- Using Mailerlite personalization features
2. Use A/B Split Headline Testing
A/B testing is another great way to see what is working for your subscribers.
You write two different headlines: A and B. And send the first one to a group and the second one to another. The heading that got more open wins. This will help you find out what your subscribers like more.
You can write headings in a different format. Like a question, controversial, simple, confusing, and more to see what works.
3. Segment Your Email List
Segmenting your email list is a great way to send targeted emails.
Suppose you are a food blogger. Then some subscribers in your email list might be interested in vegan recipes and some like non-vegan recipes.
So, you can create different segments of your list and send targeted emails to the right segment. This will help you improve engagement.
4. Send Mobile-Friendly Emails
More than half of the world’s population uses a mobile phone. That’s why it’s important to make sure that your emails can be read on a mobile device.
Mailerlite allows you to create responsive emails that will look awesome in any screen size.
Conclusion: How to Create an Email List for your Blog?
So this is how to set up an email list on a WordPress blog. Well done, because this email list will become your most powerful asset in the blogging business.
But if you haven’t yet then sign up for a free Mailerlite account and start an email list today. Plan emails and create an email marketing schedule.
To help you grow your blog I have these amazing blogging resources. You can access them here.
So, what are you going to offer as a freebie? Or do you already have an email list?
More resources to check out:
- How to write viral blog posts?
- Create a blog content strategy for one year
- Different types of blog posts that drive traffic
- How to write evergreen blog posts
I hope you found this post helpful. Follow me on Twitter, Facebook, and LinkedIn. Or why not subscribe to my newsletter and get blogging and writing tips straight to your inbox every week?


Excellent email guide here Ekta. Especially as social media becomes more chaotic and unstable, growing a list seems to be vital to your blogging success. I doubled down on building my email list after spending years ignoring it. Lesson learned. Letting your readers get your posts quickly and easily sent to their email inbox is a no brainer.
Ryan
Right, I realised it just a few days back. That’s when I learned that you should have a few people to check your blog again and again. Thanks for your comment.